Supplies
- Scissors
- Rotary cutter and mat (optional, but so helpful)
- Sewing machine & thread
- Pins
- 1 yard decorator's/indoor canvas (one side)
- 1 yard decorator's/indoor canvas (other side)
- Soft & Stable (for the bag body) - this is optional, but it is a great product. It is lighter than batting, and more stable. You could use batting, or if you want a floppier bag, don't line it with anything.
- Iron & ironing board
- Pencil/pen
- CD or DVD
- Ruler or measuring tape
| soft and stable |
***unless otherwise stated, the entire pattern uses 1/4 inch seam allowances***
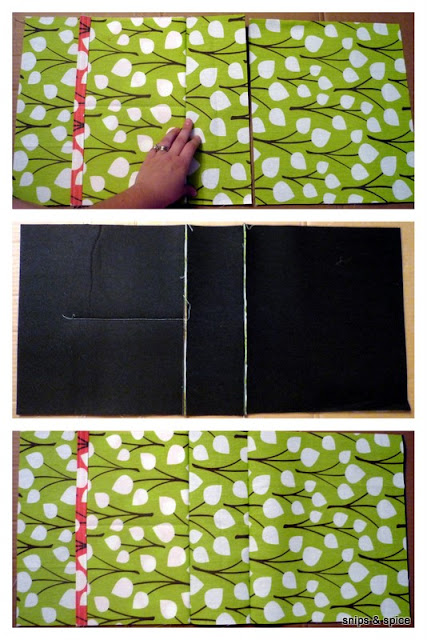
***these directions pertain to directional fabric; if yours does not have a direction, you can ignore directions***
- Begin by cutting each of your fabrics into the following sizes (the picture is to help people with directional fabric):
- 13 x 11.5 front (cut 1 soft and stable)
- 13 x 11.5 back (cut 1 soft and stable)
- 4.5 x 11.5 sides (2) (cut 2 soft and stable)
- 13 x 11.5 flap
- 4.5 x 13 bottom (cut 1 soft and stable)
- 4.5 x 5.5 side pockets (2)
- 4.5 x 7 side pocket liners (2)
- 13 x 7.5 front pocket
- 13 x 9 front pocket liner
- 3 x 43 strap
- Make your strap. Stack the straps right sides together and sew along both long sides. Flip right sides out, iron, then sew 1/4 inch from the edge along the long sides again.
- Make your pockets.
- Match your side pockets and side pocket liners. The pocket liners should be 1.5 inches taller than the pockets.
- Stack and pin your pieces along the shorter side right sides together so that the top of the pocket matches with the bottom of the pocket liner.
- Sew pocket and liner together.
- Iron the seam allowances toward the pocket liner.
- Fold the pocket on top of the liner to match the bottom corners of the liner and the pocket.
- Iron them flat.
- Top stitch along the top of the pocket to stabilize. I stitched two rows of top stitching for decorative effect.
- Repeat the process with the front pocket sewing along the longer edge this time.
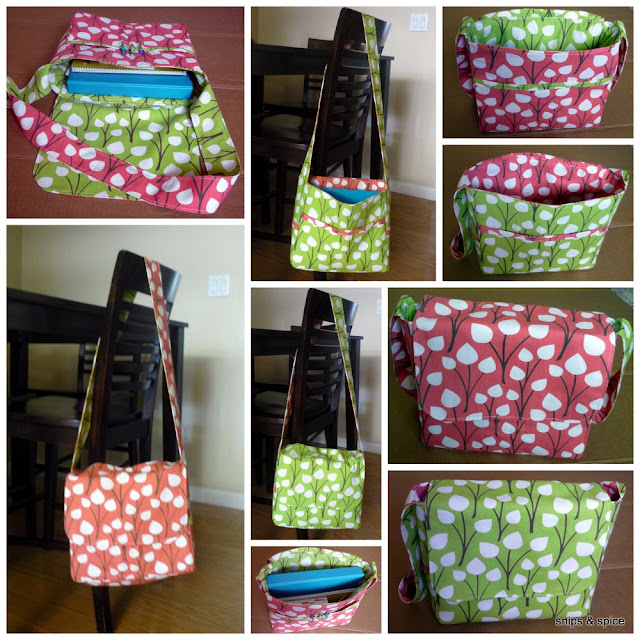
- When you are finished you will have all of the above pockets.
- Make your flap.
- Trace your cd/dvd on the two bottom corners of each of your flap pieces.
- Cut the corners so they are round.
- Stack the two flap pieces right sides together.
- Sew around the sides and bottom edges - leaving the top open. Clip around the corners.
- Flip inside out, iron, and sew 1/4 inch from the edge for the three sides you just sewed.
- Sew together bag body.
- Stack in the following order: the front piece of soft and stable, the front fabric right side up, the front pocket right side up, the bottom fabric right side down, the bottom soft and stable. Sew together.
- Mark down the center of the front pocket, then sew down to create two smaller pockets.
- Sew bag back onto the bag body by attaching to the bottom. Stack the bottom (soft and stable with bottom fabric), back fabric, and back soft and stable, then sew.
- Sew the sides to the front of the bag (remember to include the pockets and the soft and stable).
- Sew the sides to the back of the bag. You will have an opening at the bottom of each side. Pin sides to bottom, and sew a straight line to close the opening.
- Repeat entire process for the other bag fabric (minus the soft and stable). For the sake of this tutorial, we will call this the lining from now on, but understand this is not actually lining since the bag is reversible. I sewed three lines down the front pocket of this one to create pen/pencil pockets.
- Sew the flap to the bag body with the soft and stable. I sew just a little less than 1/4 inch seam allowance to ensure this seam does not show when the two sides are sewn together.
- Pin the strap into the bag body. Be sure to not twist the strap when you pin.
- With the bag right side in, place the lining right side out inside the bag and pin together around the top. Be sure to catch the straps in the pins and make the pockets line up on the same side. Sew around the top leaving a gap at the back to turn the back right side out.
- Turn the bag right side out, then pin around the top.
- Sew 1/4 inch around the top to stabilize the bag--be sure to catch the opening and sew it shut when you sew around the top.


om goodness, so darling, i am in love with the fabric!!!
ReplyDeleteLove this bag!! I will definitely be trying this out--thanks!
ReplyDeleteHi Malory - Cute bag! Thanks for stopping by my place over at Blue Velvet Chair - and yes, I'm now following to see what creative spirit you are putting out in the world.
ReplyDeleteMichael
I love this bag!!
ReplyDeleteWhat a beautiful bag and a great tutorial. TFS!! Stopping by from Fireflies and Jellybeans linky party. I am your newest follower too here and on FB.
ReplyDeleteThis is what I shared this week: http://craftybrooklynarmywife.blogspot.com/2011/06/summer-pillows.html
I am so loving this! I am pinning it! I just got a new sewing machine! YAY! I am your newest follower! ! would love it if you stopped by and became my newest follower!
ReplyDeleteNice!! I am a New Follower as well!! I will be making @ least one of these Bags!!
ReplyDeleteGreat project, thanks for sharing!
ReplyDeleteThis is great! And the tutorial is very clear. I might actually try to make one! I love your fabric too. Thanks for sharing!
ReplyDeleteYou're good! It's adorable!
ReplyDeleteOh WOW! what a great bag - and a wonderful tutorial too! Thanks for sharing!
ReplyDeleteCute bag!
ReplyDeleteYou did a great job! Fabulous fabric selection too!
ReplyDeleteThis looks great! And you did a really easy to follow tutorial too.
ReplyDeleteThis is EPIC! My daughter has a style all her own, and we battle every year trying to find something for to carry her books in. We're gonna hit the fabric store tomorrow. Thank you so much for this!
ReplyDeleteHoly moly! You're a rockstar! I love this bag! The fabric is PERFECT and I love that it is reversible!! Love it!!!
ReplyDeleteYou are so talented! I would love it if you would link up to my Tuesday Confessional link party going on now: http://www.craftyconfessions.com/2011/07/tuesday-confessional-link-up-2.html. I hope to see you soon!
ReplyDelete~Macy from Confessions of a SAHM
Very cute! It doesn't look "homemade." I'd love to try this.
ReplyDeleteI love it. The choice of fabric is really great. I saved it on my to do list - Gosh where am I supposed to get the time for all these fabulous projects? Thank you for sharing
ReplyDeleteThat's such a cute bag! And I love that it's reversible. Thanks for showing us how it's done!
ReplyDeleteThanks for linking to Take-A-Look Tuesday - - I featured you today! - Mandy, www.SugarBeeCrafts.com
ReplyDeleteSo cute! I might give this a try...just learning to sew! :) Following you from Sugar Bee Crafts. Would love for you to link this up to my {wow me} wednesday link party going on now on my blog. :)
ReplyDeleteGinger
gingersnapcrafts.blogspot.com
Wow...looks so good. You've done a wonderful job with the bag. Love the coloring of the fabric.
ReplyDeleteThis is A-mazing! You are a sewing rock star! Someday I aspire to be as crafty with my sewing maching as you are! Hope you will share wtih my Pink Hipppo Party @ http://pinkapotamus.blogspot.com/2011/07/pink-hippo-party-36.html
ReplyDeleteThis is great! My oldest wants me to make one for him in 'boy fabric'! Thanks for the tutorial, I would love for you to come and share this at my Fantastic Friday link party.
ReplyDeletehttp://ironvioletdesigns.blogspot.com
Thanks
I love this! I really want to make to use as my teacher bag this year! Where did you buy your soft and stable? I was thinking about looking at Joanns. I pinned this! :)
ReplyDeleteI love this! Thanks for sharing your tutorial for how to make this awesome bag.
ReplyDeleteI found you through Naptime Crafters and am your newest follower. Come check me out, too, if you're interested @ Carissa's Creativity Space
Such a cute bag! I was wondering also where you got your soft and stable. Is it sold on the bolt? Thanks!
ReplyDeleteI bought the soft and stable at my local AAA Sewing and Vaccuum store in Littleton Colorado, but you can purchase it directly from the manufacturer here:
ReplyDeletehttp://www.byannie.com/shop/category/supplies-and-tools/byannies-soft-and-stable/
You can buy it in various quantities (the largest is 15 yards by 58 inches wide).
I just finished one of these for my daughter, and it turned out great! Thanks for sharing!
ReplyDeleteLove this!! Thanks for sharing!
ReplyDeleteI featured you on my blog!
http://aworldofcrafts.blogspot.com/2011/08/reversable-tote.html
We just made this for my 9 year old cousin for school. It turned out great, but is a bit smaller than we expected. Not really sure that she'll be able to carry her books home from school...
ReplyDeleteI loved the recipe! You can put zipper? Or is it better to use a pushbutton on the front?
ReplyDeleteMoema.
www.moemablog.com
To infinity and beyond!
I have made a couple of these bags and They are a lot of work, but it is well worth it. Everyone is always commenting how cute they are.
ReplyDeleteHelp! I am trying to make this and am stuck on the pocket making. I am new at sewing. Can anyone help me out and explain it a little better?
ReplyDeleteThank you, Thank you and Thank you again because this bag came out awesome!!!!!
ReplyDeleteSo cute! I featured it today...here is the link...http://sewlicioushomedecor.com/sew-thankful-series-purses-handbags-day-17/
ReplyDeleteThanks for sharing it :)
Marti
We have made this bag twice now with our 2nd year sewing class in our co-op. The kids love these bags and it's a great pattern to learn new skills. I made my own with stiff interfacing and left the whole upper back edge and a little of each side open to turn it right side out. (Next time, I'll put some quilting batting in the flap to help it look similar in thickness to the stiff interfacing I used.) Then hand stitched the edge closed. I, also, added pen and pencil slots on the pockets. We have our students sewing the pockets onto the front pieces prior to putting the bag together. It's a little easier to do the center stitching line (or lines, if doing pencil holders.)
ReplyDeleteThis is a great pattern and wonderful instructions! Thank you!
Have just begun sewing again , first time since leaving school 44 years ago, and am going to try your lovely pattern out. The instructions look really good & finished bag adorable. Thank you for the pattern.
ReplyDelete