- Scissors
- Thread & sewing machine
- 1 inch wide elastic
- 2 handkerchiefs
- Pencil
- Measuring tape & calculator (or math brain)
- Pins
- The first thing you need to do is measure the waist this skirt is going on. The two cute sisters I made these for both have a waist measurement of 22 inches. From there, I add 2 inches, so my number is now 24.
- Take the new measurement and divide by 6.28. This makes my new number 3.82.
- Round down to the nearest quarter inch, so my final number is 3.75 inches.
- Fold your handkerchiefs into quarters (half and half again).
- Tie some thread around the pencil. Measure out a length of thread matching your final measurement (remember mine was 3.75 inches) and hold that point at the center point of your handkerchief. Trace a semi-circle on your handkerchief using the pencil attached to the string.
- Cut out the part you just drew. I have this nifty little circle cutting tool, so I just put the point into the center point of my handkerchief and rotate the blade to cut out. When you are finished, you should have cut a circle out of the center of your handkerchief.
- Repeat steps 5 and 6 for the other handkerchief.
- Open both handkerchiefs and place one on top of the other (both with right sides facing up) so that the points alternate. I actually took this picture after I had sewn them together because I forgot to ahead of time.
- Pin together and sew using a sewing and binding stitch.
- Sew your elastic into a waistband fitting your original measurement (22). Make sure to sew edges flat so they don't poke out.
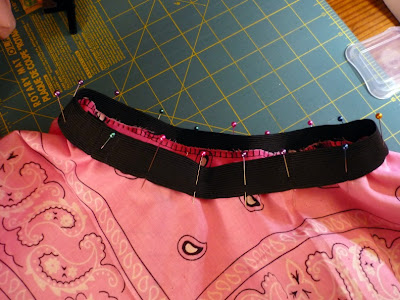
- Pin the waistband to the skirt. First pin two opposite sides. Then split the middle and pin. Continue until you have the entire skirt pinned.
- Sew waistband to skirt. Be sure to stretch the elastic to fit the fabric as you sew. Stand back and admire your work.
I will be linking up to these link parties.


Super cute- Thanks for auditioning for American Crafter!
ReplyDeletecute skirts!
ReplyDeletehappy crafting!
Linda
So Cute! And easier than it looks!
ReplyDeleteThanks:)
I'd love for you to come link up at Inspire Me Mondays
ReplyDeletehttp://singingthreelittlebirds.blogspot.com
So CUTE!! I will have to make one for my little one!!
ReplyDeleteAshley
cute!! so easy and inexpensive too! Love it!
ReplyDeleteI saw these on Craft Gossip and tonight I made my own. It turned out so cute!! My 6 and 8 year old girls both loved it. I will definately be making more. Good luck in the competition... this is super creative.... I hope you are chosen!
ReplyDeleteThanks for the great idea!!
Erin
www.noodle-and-bean.blogspot.com
So cute!!!! so glad I found your blog!!!!
ReplyDeleteHa! That is too cute! We recently went to a western-themed bday party and these would have been quite the hit!!
ReplyDelete:D hi :D its great :D I love ıt and will try ıt
ReplyDeleteThese make me wish my girl was a little bit younger and I could make her one!
ReplyDeleteThanks for linking up to Fantastic Friday. I hope you will join us again this week!
so cute!!! I love it!
ReplyDeleteWe are having a linky party if you would like to join... http://www.bubblynaturecreations.com/2011/02/project-party-weekend-springtime.html
wow officially LOVE your blog!!!!
ReplyDeletenew follower:) :)
Super cute! Can you tell me approximately what size the handkerchiefs were that you used for this project? Thanks!
ReplyDeleteI bought the handkercheifs at Michaels. I beleive they were about 20 inches square.
ReplyDeleteThanks for the size feedback. I actually ordered some online in 27X27 for this project so I think it should be a nice length in the end for my five year old. I want to try to make three layers, but no I am not sure how it will turn out! Thanks for the fun inspiration!
ReplyDeleteMade two of these in 1 hour! Can't wait to have my daughter wear them! Since right now she is only wearing skirts. I have plans to even embroider the corners of the skirts - for more flair. Thanks for this!!
ReplyDeleteThank you! I knew I wanted to make one of these but needed a tutorial to guide me through. Found yours through a Google search and loved it! Thanks for holding my hand through making it! :)
ReplyDelete