Pages Navigation Bar

Showing posts with label Skirts. Show all posts

Thursday, January 27, 2011

Handkerchief Skirt

A sewing tutorial for making a handkerchief skirt
Isn't this super cute?  How about my cute models Ella and Abby?  One of the things I love most is that it cost me less than $5 to make!  This is made with the same basic design as a circle skirt.  Note--this only works for little girls, babies, or really big handkerchiefs.  Are you ready?

Materials/Supplies
  • Scissors
  • Thread & sewing machine
  • 1 inch wide elastic
  • 2 handkerchiefs
  • Pencil
  • Measuring tape & calculator (or math brain)
  • Pins
Directions
  1. The first thing you need to do is measure the waist this skirt is going on.  The two cute sisters I made these for both have a waist measurement of 22 inches.  From there, I add 2 inches, so my number is now 24.
  2. Take the new measurement and divide by 6.28.  This makes my new number 3.82.
  3. Round down to the nearest quarter inch, so my final number is 3.75 inches.
  4. Fold your handkerchiefs into quarters (half and half again).
  5. A sewing tutorial for making a handkerchief skirt
  6. Tie some thread around the pencil.  Measure out a length of thread matching your final measurement (remember mine was 3.75 inches) and hold that point at the center point of your handkerchief.  Trace a semi-circle on your handkerchief using the pencil attached to the string.
  7. Cut out the part you just drew.  I have this nifty little circle cutting tool, so I just put the point into the center point of my handkerchief and rotate the blade to cut out.  When you are finished, you should have cut a circle out of the center of your handkerchief.
  8. A sewing tutorial for making a handkerchief skirt
  9. Repeat steps 5 and 6 for the other handkerchief.
  10. Open both handkerchiefs and place one on top of the other (both with right sides facing up) so that the points alternate.  I actually took this picture after I had sewn them together because I forgot to ahead of time.
  11. A sewing tutorial for making a handkerchief skirt
  12. Pin together and sew using a sewing and binding stitch.
  13. A sewing tutorial for making a handkerchief skirt
  14. Sew your elastic into a waistband fitting your original measurement (22).  Make sure to sew edges flat so they don't poke out.
  15. A sewing tutorial for making a handkerchief skirt
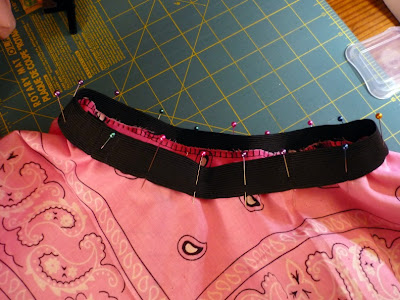
  16. Pin the waistband to the skirt.  First pin two opposite sides.  Then split the middle and pin.  Continue until you have the entire skirt pinned.
  17. A sewing tutorial for making a handkerchief skirtA sewing tutorial for making a handkerchief skirt
  18. Sew waistband to skirt.  Be sure to stretch the elastic to fit the fabric as you sew.  Stand back and admire your work.

A sewing tutorial for making a handkerchief skirt

I will be linking up to these link parties.

Wednesday, January 26, 2011

Skirt Upcycle


A few weeks ago, I saw this great skirt tutorial on MADE.  I just had to make a circle skirt.  I went to the store and found this gorgeous, medium-weight, knitted fabric.  I made the skirt, but didn't hem it yet, tried it on, and was so sad.  The fabric I had chosen was neither light enough to flow out, or stiff enough to stay out.  It hung down my body like a bunch of drapes. 

In the past, I would have just written this off as a failed project, but not this time.  I looked at the fabric, and the design, and thought about how I could fix it.  What I finally decided to do, was make it an a-line skirt.  I love the way an a-line dress or skirt fits my body, and thought that I could work with that material and that pattern.  I began by turning the skirt inside-out, and cutting triangles of fabric out of the fabric.  I cut out eight pieces.  They were each about 8 inches at the bottom (but remember that it is folded, so you should only cut 4 inches).

I then sewed the gaps shut with a sewing and binding seam on my machine.

When I was finished with all the gaps, it looked like this (still inside-out).

I then cut the bottom and hemed the skirt to fit me.  Now what I needed was something to really give this skirt some identity.  I used the extra fabric I had from all the disections, to create verticle ruffles.  I cut strips about 2.5 inches wide.  That were roughly 1.5 times the length of my skirt from waist to hem.  I used the largest stitch on my sewing machine to sew through the center of each strip.  I created the ruffles by pulling gently on one thread until the fabric puckered to the right length. 

To finish, I pinned each ruffle on top of a seam, and stitched in place.  I wore my upcycle to work yesterday, and the first thing anyone said to me was, "cute skirt Malory." 

I think this was a success, and I will have to make a circle skirt out of a different fabric (I still love the pattern, and how easy it was to make).