Pages Navigation Bar

Showing posts with label Baby. Show all posts

Sunday, August 7, 2011

Baby Sea Turtle Cupcakes

Last year, my mother-in-law was throwing a baby shower and wanted me to make the dessert.  She didn't know if the baby was going to be a boy or a girl, and the information she gave me was, "she loves sea turtles."  I spent some time thinking about what I wanted to make, and finally, with the help of Adam, I came up with the idea to have a mommy sea turtle cake, and baby sea turtle cupcakes.


This was before my blogging days, so I don't have pictures of the whole process, but I will try to be descriptive.

Since this is Cupcake Month, I am going to focus on the cupcake turtles.  The first thing I did was bake some chocolate cupcakes using my basic recipe.  After letting them cool, I cut the tops off all the cupcakes (this would be a great opportunity for making whoopie pies since you don't use the tops for the cupcakes).  I filled the cupcakes with a raspberry buttercream, but that is not necessary for the recipe.

At this point, I began working with the cupcakes one at a time.  To make the turtle shell/body, I turned the cupcake bottom upside-down and frosted the top.  I colored some fondant a light green, and covered the cupcake (click here for more information about food coloring, and here for a post about covering cakes with fondant).  If you are doing this at home, you should have a small round shape like a shell that is a solid light green color. 

The next thing I did was make the diapers.  I cut a circle of white fondant, then cut it in half, then cut two slits for the diaper.  Place the straight edge along the bottom of the cupcake and wrap around.  Then fold the diaper down, folding the sides first, then the middle over the sides.

I put Adam in charge of limbs.  He rolled small logs of light green fondant into arms and legs.  He bent the arms to make them the shape of a sea turtle arm.  Adam made the heads by covering a Reese's egg with light green fondant.

We made the finishing touches by cutting various sized circles out of dark green fondant to cover the shell.  The head was finished by adding eyes (small white circles of fondant with a black food coloring dot) and a pacifier.  I bought the small candy pacifiers, and Adam cut off the part that goes in a mouth.  We used a bit of frosting to stick the pacifier on the mouth of the turtle.  Since we didn't know the gender of the baby, we added some blue ones for boys.

And some pink ones for girls.

Then placed them on this three tier dessert stand.


Friday, July 1, 2011

The Flannel Receiving Blanket

A sewing tutorial for making flannel receiving blankets
This is one of my favorite gifts to give to first-time mothers.  As many of you know, babies seems to make frequent messes.  A new baby can go through several blankets and several outfits a day.  I love to give a bundle of these flannel blankets to new mothers: they are so soft and snuggly, you can make them in a wide variety of colors and prints, they are light (so they don't take much room), they are easy to wash, and they make great swaddlers.  Oh, and did I mention...I made these five in one afternoon?

I went to Joann's on Wednesday and it was my lucky day--all the snuggle flannel prints were on sale for 50% off!  Score!  (By the way, the sale is still on for another week)

So I bought all these cute prints.  I also love making these and using different stitches on the edge.  Each person who gets these gets a unique gift because I use different stitches and different fabrics each time.  I thought the triple stitch zig-zag went great with this heart argyle pattern.

A sewing tutorial for making flannel receiving blankets

I like how the diamonds in this stitch echoed the square design on this flannel.

A sewing tutorial for making flannel receiving blankets

I am always a sucker for a scallop edge.

A sewing tutorial for making flannel receiving blankets

This wave reminded me of the cycle the flower circles make in this flannel.

A sewing tutorial for making flannel receiving blankets

Who doesn't love hearts?  This was a big hit at the shower.

A sewing tutorial for making flannel receiving blankets

Materials (for 1 blanket)
  • 1 yard each of coordinating flannel
  • Scissors
  • Bowl
  • Pen/Marker (or rotary cutter and mat)
  • Measuring tools (like a pattern board)
  • Pins
  • Sewing machine
  • Coordinating thread
  • Iron (optional)
Directions
***This pattern uses the envelope method just like the wedding blanket, and the softest blanket.***
  1. Wash and dry fabric before beginning.  Flannel shrinks quite a bit, so you want to get that out of the way before you sew.  I iron the fabric before I begin because it is easier to work with.  The edges can get squishy when you wash and dry.
  2. Cut your flannel pieces to 34" wide, and I keep them as long as the selvage widths (about 40").  If the two pieces were not the same original width, cut down to the smaller one.
  3. Round your corners by either cutting around the bowl using the rotary cutter, or marking with pen/pencil and cutting with scissors.
  4. A sewing tutorial for making flannel receiving blankets
  5. Lay your two flannel pieces right side together, pin around, and sew around using 1" seam allowances.  I like to use larger seam allowances to allow for imprecise cutting (this saves me time).  I also want a larger seam allowance, so when I sew around the edge at the end, it catches the edges.  These blankets can get a lot of wear, and I don't want a seam ripping and all the fabric fraying.  Leave about a 4" gap to turn the blanket right side out.
  6. Before you turn your blanket right side out, cut off some of the selvage on each corner (cut down to about 1/4").
  7. Clip around the corner with the scissors (like we did on the flap of the school-time messenger bag).
  8. Turn your blanket right side out, flatten the edges either with your finger, or the iron, and pin all around.  Be sure to get your gap edges to match up with the rest of the blanket edge.
  9. Sew a decorative stitch (you could use a plain zig-zag, or a straight stitch if you don't have any decorative stitches, or try the twin needle) 1/4" from the edge all the way around.
A sewing tutorial for making flannel receiving blankets
We have so many pregnant friends right now, I am going to stock up on flannel, so I can whip some of these up for everyone.  I don't think you can ever have too many blankets.

Friday, May 13, 2011

Baby Pixie Hat

Do any of you watch glee?  Not too long ago, Quinn wore a pixie hat that went viral.  I saw this cute hat here, and I thought it would make a great baby hat and gift.  Knitted hats for baby are one of my favorite gifts because they are soft, comfy, cute, and quick.  I made this one to donate to Warm Hearts Warm Babies, so it is fit for a premie, but the pattern should fit most newborn heads.


Supplies
  • One skein Baby's First Lion Brand yarn (you can make several hats out of one skein).  This is a bulky weight yarn, which knits up more quickly than a sport or worsted weight.
  • 12 inch size 6 circular needle (this is my favorite needle for knitting baby hats).
  • Size 6 double-pointed needles
  • Stitch marker
  • Tapestry/yarn needle
  • Button or other embellishment
  • Scissors
To work the rib in this pattern, knit into the back of one stitch, then purl one stitch, repeat.  Remember to move your working yarn to the back when knitting, and the front when purling.

To work the decrease, you will knit two together by knitting in the back of both stitches.

Directions (after step 3, every time the pattern instructs you to knit, knit into the back of the stitch)
  1. With circular needles, cast on 76 stitches.
  2. Knit rows 1-6 (do not join).  This will create a garter stitch and the base of the hat.
  3. Row 7: k2, bind off first stitch, k1, bind off second stitch, k1, bind off third stitch, k1, bind off fourth stitch, k1, bind off fifth stitch, k1, bind off sixth stitch, work rib pattern to end of row. (70 stitches left on needle)
  4. Row 8: place stitch marker and join both sides to create a loop so you are knitting in a circle.  You will have the six-stitch flap hanging down.  Begin with the knit stitch and work in rib around.
  5. Continue working in rib stitch until your hat measures about 5 inches tall.
  6. Begin decrease rows:
    1. Decrease row 1: k2tog, work rib for 12 stitches, repeat to the end of the row. (65 stitches)
    2. Decrease row 2: k1, work rib for 12 stitches, repeat to the end of the row. (65 stitches)
    3. Decrease row 3: k2tog, begin with a purl stitch to work rib for 11 stitches, repeat to the end of the row. (60 stitches)
    4. Decrease row 4: k1, begin with a purl stitch to work rib for 11 stitches, repeat to the end of the row. (60 stitches)
    5. Decrease row 5: k2tog, work rib for 10 stitches, repeat to the end of the row. (55 stitches)
    6. Decrease row 6: k2tog, begin with a purl stitch to work rib for 9 stitches, repeat to the end of the row. (50 stitches)
    7. Decrease row 7: k2tog, work rib for 8 stitches, repeat to the end of the row. (45 stitches)
    8. Decrease row 8: k2tog, begin with a purl stitch to work rib for 7 stitches, repeat to the end of the row. (40 stitches)
    9. Decrease row 9: k2tog, work rib for 6 stitches, repeat to the end of the row. (35 stitches)
    10. Decrease row 10: k2tog, begin with a purl stitch to work rib for 5 stitches, repeat to the end of the row. (30 stitches)
    11. Decrease row 11: k2tog, work rib for 4 stitches, repeat to the end of the row. (25 stitches)
    12. Decrease row 12: k2tog, begin with a purl stitch to work rib for 3 stitches, repeat to the end of the row. (20 stitches)
    13. Decrease row 13: k2tog, work rib for 2 stitches, repeat to the end of the row. (15 stitches)
    14. Decrease row 14: k2tog, p1, repeat to the end of the row. (10 stitches)
    15. Decrease row 15: k2tog, repeat to the end of the row. (5 stitches)
  7. Last 2 rows: k5. (5 stitches)
  8. Cut yarn ends, and pull tail through stitches.  Weave tail into top of hat.
  9. Weave in the tail at the base of the hat, and stitch flap to base.
  10. Add embellisment over flap.

If you don't already know how to knit, I have knitting tutorials with pictures and video:

Tuesday, March 15, 2011

Hooded & Pleated Baby Towel

This is one of my favorite baby shower gifts.  These towels are perfect for cradling a baby straight from the tub; the hood cradles the baby's head while the pleats wrap the baby in fluffy softness.  I found this towel and washcloth in the re-style section of Target on sale, and I already had the ribbon.

Supplies/Materials
  • 1 washcloth
  • 1 towel
  • Thread (preferably heavy duty)
  • Accent ribbon
  • Heavy duty needle
Directions
  1. Pin pleats into the towel.  To make the first pleat, measure out 10 inches and mark with a pin.  Fold the pin back so the pleat and the pin match up at 7 inches from the edge.  Measure out 7 inches and mark with a pin; fold the pin back, so the pleat and the pin match up 4 inches from the previous pleat (repeat this pleat step). 
  2. Repeat the process, so the bottom and top pleats match to create folds.  Then repeat on the opposite side of the towel, so the pleats mirror each other on each side.
  3. Sew across the edge of the towel with a straight stitch, then reinforce the pleats by sewing again directly over the pleats.
  4. To make the hood, begin by folding back 3 inches of the washcloth on itself.
  5. Pin your accent ribbon over the fold, then sew in place about 1/8 of an inch from the edge of the ribbon.
  6. If you want a ruffle ribbon, use a long stitch length on your machine to baste a stitch down the center of your ribbon, then pull one thread to gather.  Pin the ruffle to the hood over the other ribbon.  Sew the ribbon down the center, then pull out the basted stitch.
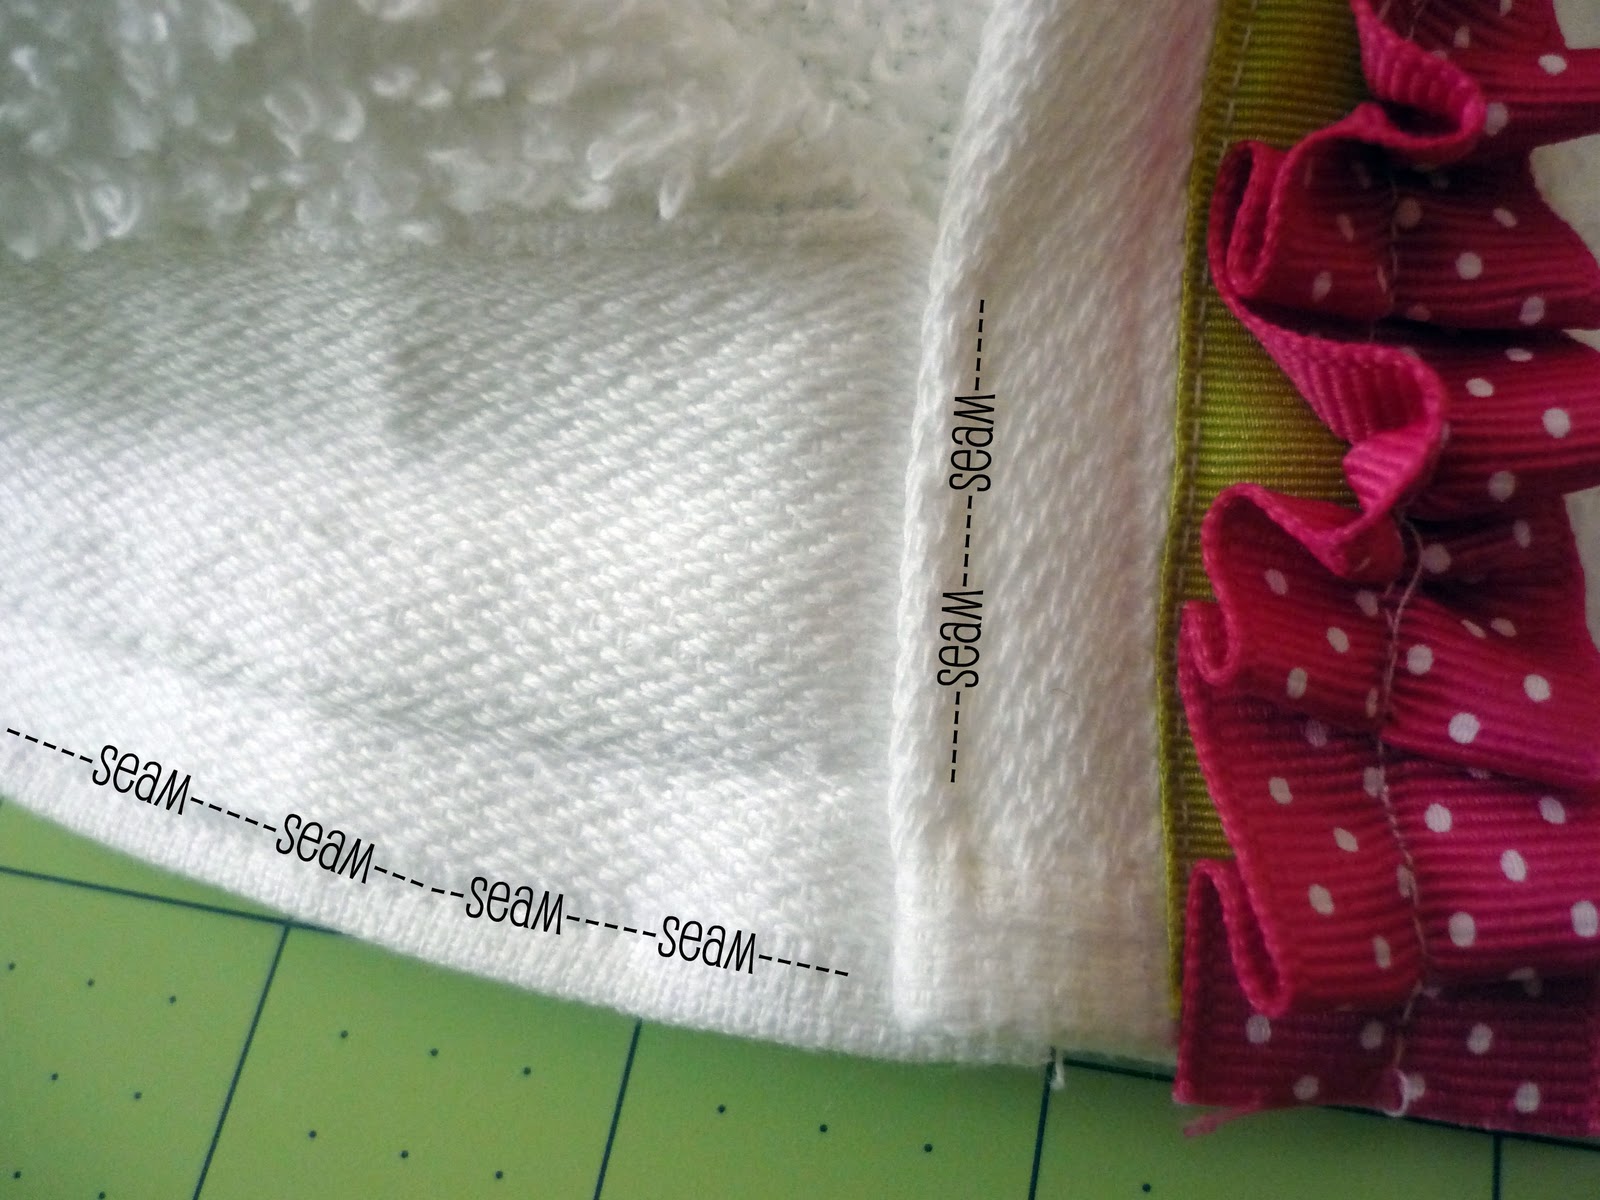
  7. Use a seam ripper to pull out the seam on the other end of the washcloth.  Fold the washcloth in half like a rectangle.  Cut off 1 inch from the corner.  You will fold the corner into the lip left from the first fold you made.  Pin in place.
  8. Sew a seam across the bottom of the hood, then about an inch up the lip to secure the corner you folded into it.
  9. Align the center of the towel with the center of the hood.  (You will want both towel and hood to have the inside facing up)
  10. Pin the hood and the towel together.  Then sew them together, making sure to reinforce your stitches.  Your seam should enclose your ribbon ends, so they won't fray.

I don't have a baby to model it, but I hope you get the picture.  I will be linking this up at these fun parties.

Thursday, January 27, 2011

Handkerchief Skirt

A sewing tutorial for making a handkerchief skirt
Isn't this super cute?  How about my cute models Ella and Abby?  One of the things I love most is that it cost me less than $5 to make!  This is made with the same basic design as a circle skirt.  Note--this only works for little girls, babies, or really big handkerchiefs.  Are you ready?

Materials/Supplies
  • Scissors
  • Thread & sewing machine
  • 1 inch wide elastic
  • 2 handkerchiefs
  • Pencil
  • Measuring tape & calculator (or math brain)
  • Pins
Directions
  1. The first thing you need to do is measure the waist this skirt is going on.  The two cute sisters I made these for both have a waist measurement of 22 inches.  From there, I add 2 inches, so my number is now 24.
  2. Take the new measurement and divide by 6.28.  This makes my new number 3.82.
  3. Round down to the nearest quarter inch, so my final number is 3.75 inches.
  4. Fold your handkerchiefs into quarters (half and half again).
  5. A sewing tutorial for making a handkerchief skirt
  6. Tie some thread around the pencil.  Measure out a length of thread matching your final measurement (remember mine was 3.75 inches) and hold that point at the center point of your handkerchief.  Trace a semi-circle on your handkerchief using the pencil attached to the string.
  7. Cut out the part you just drew.  I have this nifty little circle cutting tool, so I just put the point into the center point of my handkerchief and rotate the blade to cut out.  When you are finished, you should have cut a circle out of the center of your handkerchief.
  8. A sewing tutorial for making a handkerchief skirt
  9. Repeat steps 5 and 6 for the other handkerchief.
  10. Open both handkerchiefs and place one on top of the other (both with right sides facing up) so that the points alternate.  I actually took this picture after I had sewn them together because I forgot to ahead of time.
  11. A sewing tutorial for making a handkerchief skirt
  12. Pin together and sew using a sewing and binding stitch.
  13. A sewing tutorial for making a handkerchief skirt
  14. Sew your elastic into a waistband fitting your original measurement (22).  Make sure to sew edges flat so they don't poke out.
  15. A sewing tutorial for making a handkerchief skirt
  16. Pin the waistband to the skirt.  First pin two opposite sides.  Then split the middle and pin.  Continue until you have the entire skirt pinned.
  17. A sewing tutorial for making a handkerchief skirtA sewing tutorial for making a handkerchief skirt
  18. Sew waistband to skirt.  Be sure to stretch the elastic to fit the fabric as you sew.  Stand back and admire your work.

A sewing tutorial for making a handkerchief skirt

I will be linking up to these link parties.

Sunday, January 9, 2011

Softest Blanket Ever!


Who doesn’t love snuggling a super-soft blanket?  My one-year-old niece loves anything and everything soft.  She got a coat for Christmas made of micro-fleece.  When she opened it, she rubbed the soft coat on her cheek.  She was so excited that she took it to every person in the room to rub on our cheeks, so we could all share in the softness of the coat.  I just knew I needed to make her a soft blanket of her own, and this one can’t be beat when it comes to soft and quick to make. 

I used the “Soft N Comfy” and “Ultra Cuddle” fabrics from Joann Fabrics.  You can make this blanket with machine embroidery (like I did), with hand embroidery, with appliqué, or without any extra embellishment.

Materials/Supplies
    P1030178
  • 1 & 1/8 yard Ultra Cuddle (both fabrics are wide enough to make two blankets)
  • 1 & 1/8 yard Soft N Comfy
  • Thread
  • Light-weight, tear-away Stabilizer – if you are going to embroider
  • Cut-away Stabilizer – if you are going to embroider
  • Sewing/Embroidery Machine
  • Pins
  • Measuring Board
  • Scissors
Directions
  1. Fabric should be 60 inches wide.  Cut each fabric in half, so you have two pieces of each fabric that are 30 inches by 40 inches.  (If you are not going to embroider, skip to step 6)
  2. Embroidery on fluffy fabric can be difficult, but I have a few helpful tricks.  I embroidered on the Ultra Cuddle fabric.  Hoop the fabric with the cut-away stabilizer on the back and the tear-away stabilizer on the front.  The fabric will be completely encased in stabilizer.
  3. P1030180
  4. Embroider like normal.  The stabilizer on the front will help the fabric lie flat underneath the embroidery (the fluff shouldn’t stick through between the stitches).
  5. P1030181
  6. Clip thread and tear the stabilizer of the front of the fabric.
  7. P1030187P1030185
  8. Cut the cut-away stabilizer around your embroidery.
  9. We sew this blanket using an envelope method.  Pin the two fabrics together with right sides in.  The stretchiness of the fabrics make it a little difficult to sew, so the more pins, the easier it will be for you.
  10. P1030189
  11. Using a 2.5 stitch length and a 3/4 inch seam allowance, sew around the outside of the blanket—leave about a 4-5 inch opening on one side.
  12. P1030191
  13. Clip off the corners of the blanket (this lessens the bulk when you turn it right side out).
  14. P1030190
  15. Pull the blanket through the opening, so the right sides are out.
  16. You can pin at this point, but I usually just hold the sides together as I go.  Using a zig-zag stitch and a 1/2 inch seam allowance, sew around the entire outside of the blanket.  Be sure to get the ends sewn under where you left the opening for turning.  You can stitch an extra line close to the edge if you do not get the opening closed.
  17. P1030193P1030192
  18. Trim the ends of your thread, and you are finished!  Wasn’t that quick and easy?  I love the envelope method for many sewing projects.