Pages Navigation Bar

Showing posts with label Fondant. Show all posts

Sunday, June 10, 2012

Tausha's Wedding Cake


Hello again!  How have you been?  I know...I know...it has been a long time.  This past year was the most difficult of my teaching career so far, but it is summer once again, and I am ready to hit the ground running here at Snips and Spice (not literally running--I hate running).  Although I was too busy to blog, I have been busy cooking, caking, and crafting.  Over the next few weeks, I will be posting many of the projects I worked on over the last nine months, and working on new projects to share with you as well.

One of the things keeping me busy these past months has been cakes.  It got really crazy around Christmas with two weddings (one of which was my sister's).  The week before Christmas entailed this three-tier wedding cake, about 85 cupcakes, and the birthday cake for the bride's father.

Although the cake looks complicated, it was actually pretty easy to decorate.  I covered the cake with fondant, then piped the decorations on the side--see this post for frosting cakes, and this post for covering cakes with fondant.  To transport the cake, I boxed each tier individually. 

Most of the cakes I make do not have space between the tiers, so I use cardboard bases for each tier.  For this cake, I used Wilton'sstackable square cake bases for the top two tiers, and a foil-covered square for the bottom of the cake.  The stackable bases click into place with the columns--creating a stable cake that will last throughout the day.  This was the first time I had used this type of construction, and I couldn't believe how easy it was.  I used a dab of frosting to secure the ribbons in place around the base of each tier after I stacked them.

My friend Pam helped me cut the fruit and dab it on paper towels to keep the juices from dripping on, and melting, the fondant.  The cut fruit and flowers quickly filled the gaps between the tiers and completed this cake.

The twelve-inch bottom tier of the wedding cake was comprised of four layers of red velvet cake with cream cheese frosting.  The ten-inch center tier was four layers of lemon poppyseed cake with vanilla buttercream, and the eight-inch top tier was white chocolate cake with white chocolate raspberry filling.  I used my basic cake recipe for these cakes found in this post about baking beautiful, delicious cakes.
I made the cupcakes with the same flavors as the cake tiers.  I simply colored the frosting to match the wedding colors; see my post about food coloring here.  There are so many different cupcake holders, cupcake wrappers, cake stands, and candy to decorate with right now, that you can easily create whatever look you want.
This particular wedding was a little different because it took place on the bride's father's birthday.  Father of the bride is a man who loved apple and had a deep respect for Steve Jobs, so what could be better than a surprise Apple birthday cake at the reception?  You may not be able to tell from the picture, but the apple cake was the size of a large apple.  My sister helped me create the iPod out of fondant.

Thanks for visiting!  I hope you come back this week to see what else I have been up to.

Sunday, August 7, 2011

Baby Sea Turtle Cupcakes

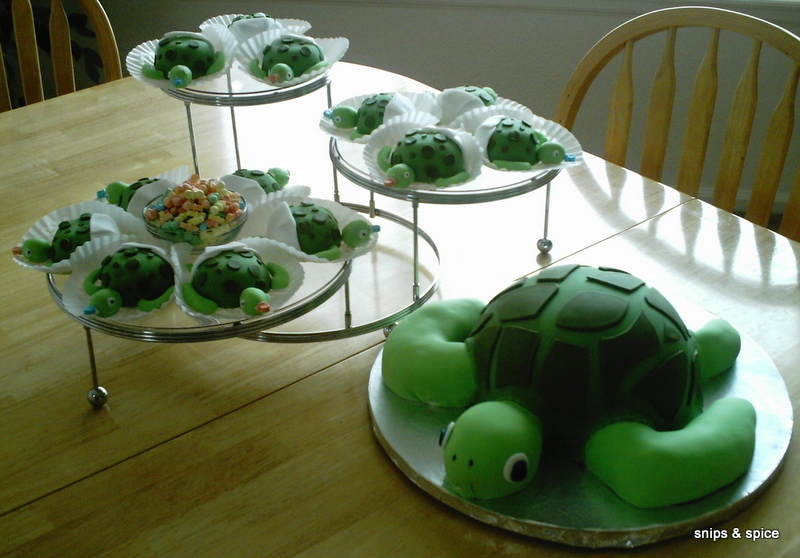
Last year, my mother-in-law was throwing a baby shower and wanted me to make the dessert.  She didn't know if the baby was going to be a boy or a girl, and the information she gave me was, "she loves sea turtles."  I spent some time thinking about what I wanted to make, and finally, with the help of Adam, I came up with the idea to have a mommy sea turtle cake, and baby sea turtle cupcakes.


This was before my blogging days, so I don't have pictures of the whole process, but I will try to be descriptive.

Since this is Cupcake Month, I am going to focus on the cupcake turtles.  The first thing I did was bake some chocolate cupcakes using my basic recipe.  After letting them cool, I cut the tops off all the cupcakes (this would be a great opportunity for making whoopie pies since you don't use the tops for the cupcakes).  I filled the cupcakes with a raspberry buttercream, but that is not necessary for the recipe.

At this point, I began working with the cupcakes one at a time.  To make the turtle shell/body, I turned the cupcake bottom upside-down and frosted the top.  I colored some fondant a light green, and covered the cupcake (click here for more information about food coloring, and here for a post about covering cakes with fondant).  If you are doing this at home, you should have a small round shape like a shell that is a solid light green color. 

The next thing I did was make the diapers.  I cut a circle of white fondant, then cut it in half, then cut two slits for the diaper.  Place the straight edge along the bottom of the cupcake and wrap around.  Then fold the diaper down, folding the sides first, then the middle over the sides.

I put Adam in charge of limbs.  He rolled small logs of light green fondant into arms and legs.  He bent the arms to make them the shape of a sea turtle arm.  Adam made the heads by covering a Reese's egg with light green fondant.

We made the finishing touches by cutting various sized circles out of dark green fondant to cover the shell.  The head was finished by adding eyes (small white circles of fondant with a black food coloring dot) and a pacifier.  I bought the small candy pacifiers, and Adam cut off the part that goes in a mouth.  We used a bit of frosting to stick the pacifier on the mouth of the turtle.  Since we didn't know the gender of the baby, we added some blue ones for boys.

And some pink ones for girls.

Then placed them on this three tier dessert stand.


Friday, August 5, 2011

Eggless Chocolate Banana Coconut Cupcakes

I am so excited about today's post.  Fortunately for me, Adam and I have no special dietary needs which means I get to bake whatever I want; I know quite a few people who aren't as lucky as we are.  Manni from I Bake Cakes is sharing an eggless cupcake recipe today.  This recipe can be easily altered to be completely vegan.


This cupcake was an experiment that turned out to be really good. The coconut is not too over powering but it gives the cupcakes more texture instead of taste. However if you prefer to have more coconut, then I would suggest using the reduced coconut milk instead of the regular milk. The frosting was a regular butter cream frosting which I flavored with coconut milk. I then dunked the frosted cupcakes in sweetened coconut. To top it off, I rolled out chocolate fondant for the “fake coconut” and used green fondant for the leaves.


Yields: 15 cupcakes

Ingredients

2 cups all purpose flour
1 ½ tsp baking soda
½ tsp salt
¾ cup granulated sugar
1 cup milk (I used 1% milk) or the reduced coconut milk (read below for more info)
1/3 cup oil (I used vegetable oil, canola should be fine)
1 tsp vanilla extract (I actually used a bit more!)
1 Tbsp vinegar
1 Medium size Banana
¾ cup shredded coconut (I had unsweetened kind)
4 Tbsp Cocoa Powder

Method:
  1. Pre-heat the oven to 350 F.
  2. In a medium sized bowl combine: flour, sugar, cocoa powder, baking soda and salt.
  3. In another bowl, mix: milk, oil, vanilla extract, and vinegar. Mix well. 
  4. Add the dry flour mixture to the wet ingredients slowly and stir until combined. (I ran this through my hand blender for a minute). This mixture is not thick as compared to the cake batter.
  5. Now add in the mashed banana and stir using rubber spatula.
  6. Fill each of the cupcakes until about 2/3 full. Transfer to the oven.
  7. Bake for 15-18 minutes, depending on the type of oven you have you may need to watch these. I had to do several batches to get the right texture. My trial ones came out dry but the last batch was amazing. To further test your cupcakes, take a clean toothpick and insert in the center; if it comes out clean, they’re done!
Frosting:

1 cup (2 sticks) unsalted butter, room temperature
2 ½ cups powdered sugar|
1/3 cup reduced coconut milk, room temperature
1 ½ tsp vanilla extract
1/8 tsp salt
1 ½ cups sweetened coconut

For Reduced Coconut Milk:

Bring coconut milk to a boil in large deep sauce pan over med-high heat. The milk will boil up high, so watch out! Reduce the heat to med-low and boil until the milk has reduced close to half of the milk. This can take approx. 30 minutes. Don’t worry too much if it’s not close to it!! As long as the milk reduces some, it’ll be fine. Next remove from heat and cool down completely. Store it in a small bowl with a lid and chill in the refrigerator. This step can be done a day or two before but remember to keep it chilled!

** Coconut milk is sold in cans, and they are sold in all the major grocery stores. I prefer the cans only because I know the ratio.

Manni's work is just gorgeous!  I picked some of my favorite pictures from her blog to share with you; she is truly an inspiration.


Don't these all look perfect?  Her work is so clean and impeccable.  I limited myself to only sharing pictures with cupcakes, but Manni also does gorgeous fondant cakes.  She was even in a cake competition last month.  Head over to say "hi" and share some love with Manni.

Monday, May 30, 2011

How to Make a Gumpaste Bow

Yesterday, I shared these graduation cakes with you.  As promised, today I am going to show you how to make a beautiful gumpaste bow.

Gumpaste is an edible food product, but I don't actually recommend eating it.  You can buy gumpaste or make it (although I haven't had any success in making my own).  When you buy gumpaste, it comes in the form of a stiff dough.  You form gumpaste into whatever shape you want, then let it dry.  Gumpaste hardens completely when dry; however, when you eat gumpaste, it turns to a slimy texture in your mouth--YUCK!  It is nice to use because it does harden completely and is completely food-safe.

Supplies
  • Gumpaste
  • Food coloring (optional)
  • Parchment paper
  • Plastic wrap (or bag)
  • Large pot (or other stand)
  • Crisco
  • Pizza cutter
  • Candy melts (you can use stiff frosting)
  • Piping bag
  • Rolling pin
Directions
  1. Color your gumpaste whatever color bow you want.  If it sticks to you hands, grease your hands with a little Crisco.  You will need a ball that fits into your hand (this should leave you a little extra)
  2. Tear off about 1/4 of the gumpaste and roll onto the parchment.  Cut into strips.  Your strip width will change with the size of your bow.  My strips were about 3/4 of an inch wide for this bow.  I used the Wilton ribbon cutter, but I have used a pizza cutter and a ruler in the past.
  3. Cut strips into various lengths.  I cut: 8-7.5" strips, 8-6" strips, 4-4.5" strips, and 4-3" strips.
  4. Roll a piece of parchment paper into a long tube.  As you cut your strips, wrap them around the parchment.  Then squish the ends together using a little Crisco as glue.
  5. Hang the roll of parchment (lined with your gumpaste loops) over your large pan.  Let dry overnight (I don't let it dry completely, but mostly.  This lets me tear off the long squished ends if I need to, without breaking the loops).
  6. When you pull them off the parchment, your loops should hold their shape.
  7. Melt some candy melts in a piping bag.  This will be used as glue for your bow.  Make a silver dollar sized blob of candy melt on the flat parchment paper.
  8. Place the largest loops in a circular pattern into the blob of candy melts.  You can place some of them on their side for a more natural look.  Then place more candy melts and the next largest loops.  Continue in this pattern until it looks like a bow.  Add candy melts where needed to secure bow.  You can also tear the ends off the bow to make it fit better.  Play around until it looks right, which sometimes takes some time.
  9. After the candy melts cool and harden, you can move the bow to your cake.  Secure in place with a little more of the melted candy melts.
 

Sunday, May 29, 2011

Graduation Cakes & a Winner!

I hope everyone is enjoying their Memorial Day weekend!  As with most of the country, we had our graduation ceremony in the past couple weeks--which means graduation cakes.  Today I am not going to focus on baking cakes,  frosting cakes, food coloring, or covering with fondant (click to see previous posts).  Today I am just sharing a little eye candy with you, but tomorrow I will share how to make a gumpaste bow!

The first cake was for Jerry.  He had a hard time deciding what he wanted and ultimately landed on a Colts cake.  I made the decision to add the middle tier with his name and graduating year, so it had something to do with graduation.


The second cake was for Hailee.  She came in with a vision.  She knew just what she wanted and I don't think I could have matched her idea better.

Come back tomorrow for a tutorial on how to make this gumpaste bow! 


The winner of 1 hour free design time from Sugar Ink Design is:

My Photo
OurAzFamily  who said...

Their work is awesome! Absolutely beautiful! I "liked" them on my personal facebook account under the name, Marsa McCool-Solis. I would love to be entered in the giveaway :) Thanks so much!

Sunday, March 13, 2011

How To Cover A Cake With Fondant

For this post, I am going to talk about covering a cake with fondant, but I will go more into the decorations later.  Covering a cake with fondant is much easier than I expected it to be.  To prepare, bake and frost a cake (tips here and here).  I recommend the following supplies/tools:
  1. Cake turntable: see my reasons in frosting tips.
  2. Rolling pin with spacers: these make it easy to keep an equal thickness throughout your fondant.
  3. Pizza cutter: this makes it easy to cut a nice clean line at the bottom of the cake.
  4. Fondant smoother: this has been crucial in my cake experience, in getting even and smooth lines.
  5. www.wilton.com
  6. Pin: for removing air holes caught between the fondant and frosting.
  7. Parchment paper: is the best for rolling fondant out on, without sticking.
There are lots of brands of fondant out there, and you can even make your own.  When I have the time, I make marshmallow fondant; I found the recipe I use here.  Sometimes, I don't have time to make fondant, so I buy it (or if I want black--black is not worth the effort).  I have tried Wilton's fondant, Satin Ice, and my latest--Fondarific. 

However silly it may sound, Fondarific is really terrific!  Of all the brands I have tried, this is the easiest to work with, and it tastes the best (no they aren't paying me for this--but maybe they should...).  When I used Fondarific, I didn't have to use sugar, cornstarch, or shortening to keep the fondant from sticking to the parchment or rolling pin.  When I use marshmallow fondant, I use crisco or cornstarch depending on the weather.

Ok!  Now that your cake is ready, flatten your fondant with your fingers and place on parchment paper.

Roll the fondant to desired size and thickness.

Try to center the fondant on your cake.  As you can see, I didn't do a great job.  You can pick the fondant up and try to fix it if it is too bad, but I thought it would work out.

This part is hard to get a picture of, but use the fondant smoother to smooth the top of the cake.  Then, use one hand to pull the fondant gently while you smooth the fondant down the cake with the smoother.  The fondant has some elasticity, so when you get a fold, gently pull it out and smooth down.

If you have any pockets of air between the fondant and the frosting, use a pin to make a tiny hole in the fondant.  Use your fingers to help expel the air from the pocket.

Use your pizza cutter to cut off all excess fondant.

When first decorating cakes, I recommend planning to use a ribbon around the base of each cake to help hide any folds/lines.

I will be linking this up at these fun parties.

Thursday, February 24, 2011

Fancy Food Coloring

I hope you are enjoying the cake tips and tools posts that I have put up these past two weeks.  I just found out that the cake baking post was one of the top ten viewed posts on Crazy Domestic this week!  Since they have been such a hit, let's keep it going with tips for using food coloring today.
  1. Food Coloring Markers:  are awesome!  Did you see my post for the thirtieth birthday cake?  You may have noticed some drawings on a couple of the tiers.  Several companies are now making markers that use food coloring instead of ink.  They draw on fondant just like a marker drawing on paper (just be sure to not poke the tip into the fondant).  You can also draw on royal icing and gum paste with the markers.
  2. Gel Food Coloring:  is the best food coloring for most of what I do.  The gel food coloring tends to have the richest color and helps with color saturation.  I use gel food coloring to color frosting, fondant, gum paste, and batter.  Gel food coloring is so potent, that you want to start by adding small amounts.  You can always add more food coloring, but you can't take any away.  This type of food coloring is also similar to paint as far as mixing colors is concerned.  I like the Wilton food coloring, and started with a variety pack.  Then I bought the larger individual containers when I needed to resupply colors.  The only downside to the gel colors is that they start to dry out after a while, and it is not worth the energy to try to get the gel to combine with your medium.  Just buy a new tub.
  3. Powdered Food Coloring:  is definitely something you want to use if you are trying to color modeling chocolate.  The water base of most food colorings will not mix with the chocolate.  Most cake supply stores sell powdered food coloring, but I haven't had much luck with craft stores that also sell cake supplies.  The powdered food coloring can be a little pricey, so I only use it with modeling chocolate.  If you can't find any near you, you can buy it online.
  4. Silver & Gold:  are actual possibilities with powdered food coloring.  You combine the powdered food coloring with a small amount of clear alcohol (like vodka) to create a metallic paint.  You then use a paintbrush to paint the food coloring onto whatever you want to color.  You don't need very much alcohol to create the paint; the alcohol dries completely and just leaves the silver or gold.  Be careful with the paint--I got a little on my table, and it took months to get off.  The powder does not easily remove.
  5. Solid vs. Variegated:  the more thoroughly you mix the coloring, the more uniform the color will be throughout your frosting/fondant/etc.  If you want a variegated look, simply do not keep mixing.  I created the flames for the thirtieth birthday cake by mixing yellow fondant, red fondant, and orange fondant together, then rolling out before completely combined.  I used the same technique with green, purple, and pink fondant to create this present cake, and white with blue for the water of this boating cake.


I hope that gives you a starting point for using food coloring with cakes.