Pages Navigation Bar

Showing posts with label Frosting. Show all posts

Thursday, June 21, 2012

Carrot Cake Favorite


Most of the cakes I make are variations of my basic cake recipe, but this recipe I adapted from my fan-favorite zucchini cake.  Just so you know--I am going to do some shameless bragging about this recipe.  Feel free to skip the rest of this self-gratuitous paragraph.  This is one of the best cakes, and hands down the best carrot cake, I have ever tasted.  As many of you know, Adam is not generally a fan of sweets, but he snuck a cupcake and a mini cupcake before I could take pictures.  This cake pleased everyone from the ninety-five-year-old Grandma, whose birthday we celebrated, all the way down to the toddlers.

Ok.  I'm done now.  Let's get to the recipe.


Cake Ingredients
  • 3 Cups all-purpose flour
  • 2 Cups dark brown sugar
  • 1 teaspoon salt
  • 1.5 teaspoons baking soda
  • 1 teaspoon baking powder
  • 1 Tablespoon cinnamon
  • 1 Tablespoon vanilla
  • 4 eggs
  • 3/4 Cup vegetable oil
  • 3 Cups grated carrots
  • 1/2 Cup golden raisins
  • 1/2 Cup black (I'm not sure what these are called) raisins
  • 1 Cup crushed walnuts

Frosting Ingredients
  • 8 oz cream cheese
  • 1 Cup (2 sticks) butter - this makes a more buttery cream cheese frosting; if you really like cream cheese, use just one stick of butter
  • 2-3 Cups powdered sugar
  • 1 Tablespoon vanilla

Mix and Bake (for tips on baking see this post)
  1. Preheat oven to 325 degrees F
  2. Sift together the flour, baking soda, baking powder, cinnamon, and salt together into medium mixing bowl
  3. Combine brown sugar and dry mixture in large mixing bowl--mix well
  4. Beat together the eggs and oil in the small mixing bowl
  5. Add egg and oil mixture to large mixing bowl--add vanilla while mixing these ingredients together (DO NOT OVER-MIX)
  6. Your batter at this point will be sort of stiff and sticky like a dough
  7. Add carrots, raisins, and nuts, and mix until dispersed--the batter becomes much more moist and like a batter
  8. Spray pan with baking spray, and pour batter into pan (use spatula to scrape out mixing bowl)
  9. Bake at 325 degrees F for 50 minutes (cupcakes take much less time: about 12-15 minutes for minis and 18-22 for regular)
  10. Place pan on cooling rack for 15 minutes
  11. Turn cake out onto rack to finish cooling

Mix Frosting (for frosting tips see this post)
  1. After putting cake in oven, remove cream cheese and butter from fridge to soften 
  2. Cream together butter and cream cheese
  3. Add powdered sugar to frosting mixture and mix well; add enough sugar so that it tastes delicious and is stiff enough to hold whatever shape you are going for
  4. Mix vanilla into frosting
  5. When cake is cool, stack, frost, and decorate


Monday, June 18, 2012

Steve and Judy's Surprise Wedding Cake

Last month my father-in-law got married, and I made this wedding cake for the occasion.  It was a simple, but delicious, white chocolate cake with vanilla buttercream frosting.  I used my basic cake recipe, and the frosting techniques found here.  Since I didn't cover this cake with fondant, after I frosted each tier, I wet the spatula to smooth the frosting.  I used a medium round tip to make the pearl border at the bottom of each tier.

The flowers are colored fondant.  To make these, roll out the fondant to about 1/8 inch thick, then cut with a flower shaped cutter.  Place the flowers on a sponge and press in the middle of the flower with a small dowel (I used the back of a small paint brush) to give the flowers dimension.  Let the flowers dry overnight.  Use a small dot of frosting to glue each flower to the cake.

Oh, I almost forgot to tell you...there's something else you might want to know about this cake.  Just one part of the surprise.  Are you ready?  Can you guess what the secret is???

It's only 6 inches tall!  Steve and Judy got married in Estes Park without a reception, so Adam and I brought them this cake as a surprise.  I had so much fun making this tiny cake.  I used a 6 inch pan, a 4 inch pan, and a 2 inch pan.  Seriously, how cute is this cake?


So the question is...could you tell?

Sunday, June 10, 2012

Tausha's Wedding Cake


Hello again!  How have you been?  I know...I know...it has been a long time.  This past year was the most difficult of my teaching career so far, but it is summer once again, and I am ready to hit the ground running here at Snips and Spice (not literally running--I hate running).  Although I was too busy to blog, I have been busy cooking, caking, and crafting.  Over the next few weeks, I will be posting many of the projects I worked on over the last nine months, and working on new projects to share with you as well.

One of the things keeping me busy these past months has been cakes.  It got really crazy around Christmas with two weddings (one of which was my sister's).  The week before Christmas entailed this three-tier wedding cake, about 85 cupcakes, and the birthday cake for the bride's father.

Although the cake looks complicated, it was actually pretty easy to decorate.  I covered the cake with fondant, then piped the decorations on the side--see this post for frosting cakes, and this post for covering cakes with fondant.  To transport the cake, I boxed each tier individually. 

Most of the cakes I make do not have space between the tiers, so I use cardboard bases for each tier.  For this cake, I used Wilton'sstackable square cake bases for the top two tiers, and a foil-covered square for the bottom of the cake.  The stackable bases click into place with the columns--creating a stable cake that will last throughout the day.  This was the first time I had used this type of construction, and I couldn't believe how easy it was.  I used a dab of frosting to secure the ribbons in place around the base of each tier after I stacked them.

My friend Pam helped me cut the fruit and dab it on paper towels to keep the juices from dripping on, and melting, the fondant.  The cut fruit and flowers quickly filled the gaps between the tiers and completed this cake.

The twelve-inch bottom tier of the wedding cake was comprised of four layers of red velvet cake with cream cheese frosting.  The ten-inch center tier was four layers of lemon poppyseed cake with vanilla buttercream, and the eight-inch top tier was white chocolate cake with white chocolate raspberry filling.  I used my basic cake recipe for these cakes found in this post about baking beautiful, delicious cakes.
I made the cupcakes with the same flavors as the cake tiers.  I simply colored the frosting to match the wedding colors; see my post about food coloring here.  There are so many different cupcake holders, cupcake wrappers, cake stands, and candy to decorate with right now, that you can easily create whatever look you want.
This particular wedding was a little different because it took place on the bride's father's birthday.  Father of the bride is a man who loved apple and had a deep respect for Steve Jobs, so what could be better than a surprise Apple birthday cake at the reception?  You may not be able to tell from the picture, but the apple cake was the size of a large apple.  My sister helped me create the iPod out of fondant.

Thanks for visiting!  I hope you come back this week to see what else I have been up to.

Sunday, August 7, 2011

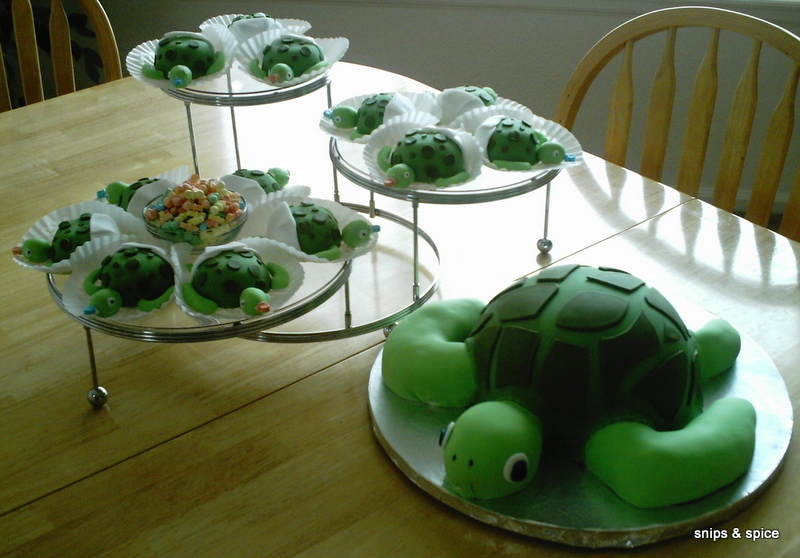
Baby Sea Turtle Cupcakes

Last year, my mother-in-law was throwing a baby shower and wanted me to make the dessert.  She didn't know if the baby was going to be a boy or a girl, and the information she gave me was, "she loves sea turtles."  I spent some time thinking about what I wanted to make, and finally, with the help of Adam, I came up with the idea to have a mommy sea turtle cake, and baby sea turtle cupcakes.


This was before my blogging days, so I don't have pictures of the whole process, but I will try to be descriptive.

Since this is Cupcake Month, I am going to focus on the cupcake turtles.  The first thing I did was bake some chocolate cupcakes using my basic recipe.  After letting them cool, I cut the tops off all the cupcakes (this would be a great opportunity for making whoopie pies since you don't use the tops for the cupcakes).  I filled the cupcakes with a raspberry buttercream, but that is not necessary for the recipe.

At this point, I began working with the cupcakes one at a time.  To make the turtle shell/body, I turned the cupcake bottom upside-down and frosted the top.  I colored some fondant a light green, and covered the cupcake (click here for more information about food coloring, and here for a post about covering cakes with fondant).  If you are doing this at home, you should have a small round shape like a shell that is a solid light green color. 

The next thing I did was make the diapers.  I cut a circle of white fondant, then cut it in half, then cut two slits for the diaper.  Place the straight edge along the bottom of the cupcake and wrap around.  Then fold the diaper down, folding the sides first, then the middle over the sides.

I put Adam in charge of limbs.  He rolled small logs of light green fondant into arms and legs.  He bent the arms to make them the shape of a sea turtle arm.  Adam made the heads by covering a Reese's egg with light green fondant.

We made the finishing touches by cutting various sized circles out of dark green fondant to cover the shell.  The head was finished by adding eyes (small white circles of fondant with a black food coloring dot) and a pacifier.  I bought the small candy pacifiers, and Adam cut off the part that goes in a mouth.  We used a bit of frosting to stick the pacifier on the mouth of the turtle.  Since we didn't know the gender of the baby, we added some blue ones for boys.

And some pink ones for girls.

Then placed them on this three tier dessert stand.


Friday, August 5, 2011

Eggless Chocolate Banana Coconut Cupcakes

I am so excited about today's post.  Fortunately for me, Adam and I have no special dietary needs which means I get to bake whatever I want; I know quite a few people who aren't as lucky as we are.  Manni from I Bake Cakes is sharing an eggless cupcake recipe today.  This recipe can be easily altered to be completely vegan.


This cupcake was an experiment that turned out to be really good. The coconut is not too over powering but it gives the cupcakes more texture instead of taste. However if you prefer to have more coconut, then I would suggest using the reduced coconut milk instead of the regular milk. The frosting was a regular butter cream frosting which I flavored with coconut milk. I then dunked the frosted cupcakes in sweetened coconut. To top it off, I rolled out chocolate fondant for the “fake coconut” and used green fondant for the leaves.


Yields: 15 cupcakes

Ingredients

2 cups all purpose flour
1 ½ tsp baking soda
½ tsp salt
¾ cup granulated sugar
1 cup milk (I used 1% milk) or the reduced coconut milk (read below for more info)
1/3 cup oil (I used vegetable oil, canola should be fine)
1 tsp vanilla extract (I actually used a bit more!)
1 Tbsp vinegar
1 Medium size Banana
¾ cup shredded coconut (I had unsweetened kind)
4 Tbsp Cocoa Powder

Method:
  1. Pre-heat the oven to 350 F.
  2. In a medium sized bowl combine: flour, sugar, cocoa powder, baking soda and salt.
  3. In another bowl, mix: milk, oil, vanilla extract, and vinegar. Mix well. 
  4. Add the dry flour mixture to the wet ingredients slowly and stir until combined. (I ran this through my hand blender for a minute). This mixture is not thick as compared to the cake batter.
  5. Now add in the mashed banana and stir using rubber spatula.
  6. Fill each of the cupcakes until about 2/3 full. Transfer to the oven.
  7. Bake for 15-18 minutes, depending on the type of oven you have you may need to watch these. I had to do several batches to get the right texture. My trial ones came out dry but the last batch was amazing. To further test your cupcakes, take a clean toothpick and insert in the center; if it comes out clean, they’re done!
Frosting:

1 cup (2 sticks) unsalted butter, room temperature
2 ½ cups powdered sugar|
1/3 cup reduced coconut milk, room temperature
1 ½ tsp vanilla extract
1/8 tsp salt
1 ½ cups sweetened coconut

For Reduced Coconut Milk:

Bring coconut milk to a boil in large deep sauce pan over med-high heat. The milk will boil up high, so watch out! Reduce the heat to med-low and boil until the milk has reduced close to half of the milk. This can take approx. 30 minutes. Don’t worry too much if it’s not close to it!! As long as the milk reduces some, it’ll be fine. Next remove from heat and cool down completely. Store it in a small bowl with a lid and chill in the refrigerator. This step can be done a day or two before but remember to keep it chilled!

** Coconut milk is sold in cans, and they are sold in all the major grocery stores. I prefer the cans only because I know the ratio.

Manni's work is just gorgeous!  I picked some of my favorite pictures from her blog to share with you; she is truly an inspiration.


Don't these all look perfect?  Her work is so clean and impeccable.  I limited myself to only sharing pictures with cupcakes, but Manni also does gorgeous fondant cakes.  She was even in a cake competition last month.  Head over to say "hi" and share some love with Manni.

Thursday, May 19, 2011

Mmmmmm...Peanut Butter Frosting

If you have been reading my blog for a while, you probably already know that Adam does NOT like sweets/treats (yes I think this is practically criminal).  Last week we had a retirement party for a co-worker of mine.  I was asked to bring the cupcakes.  I wanted to make something new for my department, and I thought about the favorite treats we have at lunch.  Anything chocolate, caramel, or peanut butter is a big hit.  After I made this recipe, Adam ate a cupcake and told me it was the best cupcake I had ever made.  He has even eaten five in the last week!

I also was to give a shout out and thanks to Manni from I Bake Cakes.  I was the winner of a giveaway on her blog where I got this cute cupcake stand.  She makes the most beautiful cupcakes I have ever seen.  You should hop over if you have a moment and take a peek.

Ingredients
  • 1 stick (4 oz) softened butter
  • 1/2 Cup creamy peanut butter
  • 1 bag peanut butter chips
  • 3 Cups powdered sugar
  • 1/4 - 1/2 Cup milk
Directions
  1. Cream together the butter and peanut butter.
  2. Melt the peanut butter chips in the microwave.  Set the power level to 7, and microwave at 30 second intervals stirring between each interval.  (It took me about 1.5 minutes)
  3. Add the melted peanut butter chips to the mixer and cream together.
  4. Add one cup of powdered sugar to the mixture.  It will appear very dry. 
  5. Drizzle a small amount of milk until it reaches a creamy texture. 
  6. Repeat steps 4 and 5 until all the sugar is incorporated.  When you are finished, your frosting should be creamy, but stiff enough to hold its shape.

Thursday, February 24, 2011

Fancy Food Coloring

I hope you are enjoying the cake tips and tools posts that I have put up these past two weeks.  I just found out that the cake baking post was one of the top ten viewed posts on Crazy Domestic this week!  Since they have been such a hit, let's keep it going with tips for using food coloring today.
  1. Food Coloring Markers:  are awesome!  Did you see my post for the thirtieth birthday cake?  You may have noticed some drawings on a couple of the tiers.  Several companies are now making markers that use food coloring instead of ink.  They draw on fondant just like a marker drawing on paper (just be sure to not poke the tip into the fondant).  You can also draw on royal icing and gum paste with the markers.
  2. Gel Food Coloring:  is the best food coloring for most of what I do.  The gel food coloring tends to have the richest color and helps with color saturation.  I use gel food coloring to color frosting, fondant, gum paste, and batter.  Gel food coloring is so potent, that you want to start by adding small amounts.  You can always add more food coloring, but you can't take any away.  This type of food coloring is also similar to paint as far as mixing colors is concerned.  I like the Wilton food coloring, and started with a variety pack.  Then I bought the larger individual containers when I needed to resupply colors.  The only downside to the gel colors is that they start to dry out after a while, and it is not worth the energy to try to get the gel to combine with your medium.  Just buy a new tub.
  3. Powdered Food Coloring:  is definitely something you want to use if you are trying to color modeling chocolate.  The water base of most food colorings will not mix with the chocolate.  Most cake supply stores sell powdered food coloring, but I haven't had much luck with craft stores that also sell cake supplies.  The powdered food coloring can be a little pricey, so I only use it with modeling chocolate.  If you can't find any near you, you can buy it online.
  4. Silver & Gold:  are actual possibilities with powdered food coloring.  You combine the powdered food coloring with a small amount of clear alcohol (like vodka) to create a metallic paint.  You then use a paintbrush to paint the food coloring onto whatever you want to color.  You don't need very much alcohol to create the paint; the alcohol dries completely and just leaves the silver or gold.  Be careful with the paint--I got a little on my table, and it took months to get off.  The powder does not easily remove.
  5. Solid vs. Variegated:  the more thoroughly you mix the coloring, the more uniform the color will be throughout your frosting/fondant/etc.  If you want a variegated look, simply do not keep mixing.  I created the flames for the thirtieth birthday cake by mixing yellow fondant, red fondant, and orange fondant together, then rolling out before completely combined.  I used the same technique with green, purple, and pink fondant to create this present cake, and white with blue for the water of this boating cake.


I hope that gives you a starting point for using food coloring with cakes.

Wednesday, February 23, 2011

10 Tips and Tools for Frosting Cakes


Last week, I shared my top 10 cake baking tips and tools with you.  If you missed the post, click here.  Now that you are practically an expert {wink wink}, let's move on to decorating cakes.  Now, I don't actually consider myself an expert at all, but I love learning as I go.  If you are looking for lots of tips about decorating frosted cakes, you are out of luck.  Sorry.  The best advice I can offer in that arena is to cover with delicious candy or nuts.  The only time I stick with a frosted cake is when I am making it for a child.  Other than that, I don't think that I will ever try to simply frost a cake again, now that I know the smooth finish of a fondant-covered cake (another casualty to my "type-a" personality).  If you are interested in that aspect of cake decorating, stick around. 

When I started writing this post, I had a hard time finding ten tips, because I had about seven different aspects of cake decorating to talk about, but I had lots of tips for each one.  The post was getting longer and longer, and I thought that it would be overwhelming to new cake decorators.  To try and alleviate some of the overload, I am breaking this part into a few separate posts.  Today, we are going to focus on the basics of frosting.  In the past few years, this is what I've learned.

Frosting Cakes
  1. Picking the Right Frosting.  My very favorite frosting is the frosting from the bakery at King Soopers (kroger).  Did you know that you can buy frosting directly from the bakery counter for cheaper than the butter to make your own?  I really like the consistency, the flavor, and the color.  The frosting is really white, delicious, and a pretty stiff, so it holds up well under the weight of the fondant.  It also helps that it has a pretty long shelf life.  Go to your local supermarket and ask them what frosting they sell and for what price.  See if this is an option for you.  I am not a big fan of frosting from the shelf.
  2. Glue it to the Cake Board.  Use a smear of frosting to glue the cake to the cake board, that way you have no slippage as you try to frost or decorate.  You want your cake to stay put!
  3. Use a Turntable.  A turntable will actually help with almost every aspect of cake decorating.  To be able to easily turn the cake as you frost, fondant, or decorate, will make you job much easier.  It will also help when you try to even your frosting.
  4. photo courtesy of http://www.kmart.com/
  5. To Coat or Not To Coat?  I have seen, and been told, to make a "crumb coat" or "dirty ice" cakes before frosting them for the decorative/outside layer.  Since I cover all my cakes with fondant in the end, I think that is a wasted step.  Number one: I love frosting; I view cake as a frosting delivery system, so a thin layer just won't work for me.  Number two: why would I want to frost a thin layer of frosting, then repeat with another layer of frosting?  It seems like a waste of time to me.  Number three: if there are a few crumbs in my only layer of frosting, it doesn't really matter since it will be covered in fondant anyway. 
  6. Filling Seepage - Gross!  If you have a filling (other than the frosting) between the layers of your cake, make sure you build a dam around the filling with whatever frosting you will use to frost the cake.
  7. Use an Angled Spatula.  This will be one of your favorite cake tools.  The angle makes it easy to get a smooth finish on the frosting without getting your fingers into the frosting and making divots.  (you use the back of the spatula)
  8. photo courtesy of http://www.amazon.com/
  9. Start at the Top.   Here is how I frost a cake, I try to always have the edge that was on the pan (the bottom) as my top layer.  I have very few crumb problems this way.  I take a large dollop of frosting and drop it on the top of the cake.  Spread the frosting to the edges, then down the sides.
  10. Push--Don't Pull! Use the spatula to push the frosting from the center to the edge of the cake.  Be sure to NOT pull back on the frosting, or you will have crumbs pick up off the cake into the frosting.  To remove the spatula from the frosting, gently lift the spatula off while you are pushing.
  11. More is Better.  I found that you can always take frosting away from the cake once you get it all covered.  The frosting seals in the cake, so use lots to avoid crumbs.  Then use the spatula to remove excess frosting.  Simply turn the spatula on its side and scrape frosting off, leaving a thinner layer left on the cake.
  12. Smooth & Even.  Try to get the frosting as smooth as possible, but more importantly, get you frosting straight.  Try to keep your frosting an even width all around your cake, so the cake shape is easily identifiable.  To be honest, this is the hardest part for me.  Here is what I usually get, then I cover with fondant.  I just keep at it with the spatula, until I am happy or fed up :)


I will be linking this up to these fun link parties!