Pages Navigation Bar

Wednesday, March 16, 2011

Delicious Chicken Pot Pie

My father would be horrified if he knew that I was using perfectly new chicken breasts to make chicken pot pie.  In his opinion, chicken pot pie should only be made with leftovers (and isn't worth wasting the new delicious chicken on).  That being said...he hasn't ever had my chicken pot pie.  Isn't it pretty?  I might be a little too proud of my crust.

People are often surprised to learn, because I am a baker,  that I don't really like cooking, and I don't know how to cook more than a few meals.  (I have been learning more since getting married, but I know that I like to cook more in the summer when I don't have to work all day).

Ingredients
  • Filling
    • 2 1/2 cups chopped veggies (I like 1 cup carrots, 1/2 cup corn, 1/2 cup peas, 1/2 cup celery)
    • 2 large chicken breasts cubed
    • White Pepper Gravy (I tried homemade, and a packet, and they both turned out great!  I think it is worth the time saved to use the packet)
    • 1/2 teaspoon celery seed
  • Pie Crust
    • 1 cup shortening
    • 1 1/3 teaspoon salt
    • 2 cups flour
    • 2/3 cup water
    • 1 egg white for brushing the crust
Supplies
  • Large pot
  • Pie pan
  • Rolling pin
  • Parchment paper
  • Fork
  • Large bowl
Directions
  1. Preheat oven to 425 degrees.
  2. Place the chicken and veggies in the pot and cover with water.  Boil over medium heat for 15 minutes, then drain.  Make crust while boiling.
  3. To make pie crust, mix together flour and salt in large bowl.  Cut the shortening into the flour with a pastry blender, or two knives. 
  4. Slowly add water and mix in with fork.  The key to making flaky delicious crust (as taught to me by my mother), is to mix as little as possible.  Take 1/2 the dough and flatten onto the parchment paper.  The dough will seem a little dry, but just mush it together.
  5. Roll out and place in pie crust.  Make sure to poke holes in the bottom and sides for steam to escape.
  6. Fill the pie with the chicken and veggies; then, make the gravy and pour over chicken and veggies.
  7. Roll out the other 1/2 dough and cover pie.  Dab a little water between the top and bottom crusts around the edge to seal, then cut off excess and pleats edges.  Cut holes in the top to let steam escape.
  8. Beat the egg white with a little water, and brush on crust.
  9. Bake for about 35 minutes.  You want the crust to be a golden brown.
  10. Let cool for 10 minutes before cutting.

I will bring this to these parties.

Tuesday, March 15, 2011

Hooded & Pleated Baby Towel

This is one of my favorite baby shower gifts.  These towels are perfect for cradling a baby straight from the tub; the hood cradles the baby's head while the pleats wrap the baby in fluffy softness.  I found this towel and washcloth in the re-style section of Target on sale, and I already had the ribbon.

Supplies/Materials
  • 1 washcloth
  • 1 towel
  • Thread (preferably heavy duty)
  • Accent ribbon
  • Heavy duty needle
Directions
  1. Pin pleats into the towel.  To make the first pleat, measure out 10 inches and mark with a pin.  Fold the pin back so the pleat and the pin match up at 7 inches from the edge.  Measure out 7 inches and mark with a pin; fold the pin back, so the pleat and the pin match up 4 inches from the previous pleat (repeat this pleat step). 
  2. Repeat the process, so the bottom and top pleats match to create folds.  Then repeat on the opposite side of the towel, so the pleats mirror each other on each side.
  3. Sew across the edge of the towel with a straight stitch, then reinforce the pleats by sewing again directly over the pleats.
  4. To make the hood, begin by folding back 3 inches of the washcloth on itself.
  5. Pin your accent ribbon over the fold, then sew in place about 1/8 of an inch from the edge of the ribbon.
  6. If you want a ruffle ribbon, use a long stitch length on your machine to baste a stitch down the center of your ribbon, then pull one thread to gather.  Pin the ruffle to the hood over the other ribbon.  Sew the ribbon down the center, then pull out the basted stitch.
  7. Use a seam ripper to pull out the seam on the other end of the washcloth.  Fold the washcloth in half like a rectangle.  Cut off 1 inch from the corner.  You will fold the corner into the lip left from the first fold you made.  Pin in place.
  8. Sew a seam across the bottom of the hood, then about an inch up the lip to secure the corner you folded into it.
  9. Align the center of the towel with the center of the hood.  (You will want both towel and hood to have the inside facing up)
  10. Pin the hood and the towel together.  Then sew them together, making sure to reinforce your stitches.  Your seam should enclose your ribbon ends, so they won't fray.

I don't have a baby to model it, but I hope you get the picture.  I will be linking this up at these fun parties.

Sunday, March 13, 2011

How To Cover A Cake With Fondant

For this post, I am going to talk about covering a cake with fondant, but I will go more into the decorations later.  Covering a cake with fondant is much easier than I expected it to be.  To prepare, bake and frost a cake (tips here and here).  I recommend the following supplies/tools:
  1. Cake turntable: see my reasons in frosting tips.
  2. Rolling pin with spacers: these make it easy to keep an equal thickness throughout your fondant.
  3. Pizza cutter: this makes it easy to cut a nice clean line at the bottom of the cake.
  4. Fondant smoother: this has been crucial in my cake experience, in getting even and smooth lines.
  5. www.wilton.com
  6. Pin: for removing air holes caught between the fondant and frosting.
  7. Parchment paper: is the best for rolling fondant out on, without sticking.
There are lots of brands of fondant out there, and you can even make your own.  When I have the time, I make marshmallow fondant; I found the recipe I use here.  Sometimes, I don't have time to make fondant, so I buy it (or if I want black--black is not worth the effort).  I have tried Wilton's fondant, Satin Ice, and my latest--Fondarific. 

However silly it may sound, Fondarific is really terrific!  Of all the brands I have tried, this is the easiest to work with, and it tastes the best (no they aren't paying me for this--but maybe they should...).  When I used Fondarific, I didn't have to use sugar, cornstarch, or shortening to keep the fondant from sticking to the parchment or rolling pin.  When I use marshmallow fondant, I use crisco or cornstarch depending on the weather.

Ok!  Now that your cake is ready, flatten your fondant with your fingers and place on parchment paper.

Roll the fondant to desired size and thickness.

Try to center the fondant on your cake.  As you can see, I didn't do a great job.  You can pick the fondant up and try to fix it if it is too bad, but I thought it would work out.

This part is hard to get a picture of, but use the fondant smoother to smooth the top of the cake.  Then, use one hand to pull the fondant gently while you smooth the fondant down the cake with the smoother.  The fondant has some elasticity, so when you get a fold, gently pull it out and smooth down.

If you have any pockets of air between the fondant and the frosting, use a pin to make a tiny hole in the fondant.  Use your fingers to help expel the air from the pocket.

Use your pizza cutter to cut off all excess fondant.

When first decorating cakes, I recommend planning to use a ribbon around the base of each cake to help hide any folds/lines.

I will be linking this up at these fun parties.

Saturday, March 12, 2011

Using a Twin Needle

I recently discovered the wonder of a twin needle.  It's actually quite simple to use, and sews perfectly parallel lines.  The most difficult part is threading the needle; I recommend reading your owner's manual.  My machine has a setting specially for the twin needle to prevent the needle hitting the presser foot (and breaking).  If your machine doesn't have a different setting, be sure to sew in a straight line, with the needle centered.

My machine has two different tension plates, so the two top threads each take a side.  I tried taking multiple pictures, but none came out great.


I used three different colored threads to better demonstrate exactly how the twin needle works.  Two of the threads are threaded through the top of the machine, and each threads goes through one side of the needle.  The last thread is the bobbin thread.  I used white for my main thread, brown for my secondary top thread, and red for the bobbin.


Did you know that you can buy twin needles in different widths?  Each width gives you a different look, but functions the same way.


You can sew around curves with the twin needle (like I did on the reversible bag), but be sure to sew very slowly.  If you sew a curve too fast, you will place pressure on the needle, and it will break.

Now go and get a twin needle, so you can sew perfectly parallel lines!

Monday, March 7, 2011

Child's Drawstring Backpack

My friend Brook has four cute little ones.  I made Sunday bags for each of them, except her latest, Aiden.  Aiden is two now, and old enough to have his own backpack (that Mom and Dad won't have to carry) in which to bring his quiet toys to church.  I love these drawstring backpacks.  They are so easy to whip up in an afternoon.

Materials/Supplies
  • 1/3 yard main fabric ( I used a light-weight denim)
  • Scrap of accent/pocket fabric (needs to be about 6 inches by 13 inches, or 6.5 inches by 12 inches)
  • 6 x 6.5 inch interfacing (I used heavy-weight)
  • Cord or Rope
  • Thread
  • Pins
  • Scissors
Directions
  1. Unless otherwise directed, use 1/4 inch seam allowances. 
  2. Make your pocket.  Cut your accent fabric into two pieces matching the interfacing.  Use the envelope method to sew the interfacing between the two layers of fabric and create a pocket.  Baste the small opening shut, and topstitch the top of the pocket.  I embellished my pocket with some embroidery and applique, but you could leave it plain or use any embellishment your heart desires.
  3. Cut your main fabric into a long piece measuring 9 inches by 24 inches.  Fold short sides back 1/4 inch and sew.
  4. Sew your pocket to the front of the bag, sewing 1/8 inch from the edge of the pocket.  I actually forgot to sew mine on until after step 9, but now really is the best time to do it.  Center between the two sides, and sew it about 3-4 inches from top edge.
  5. Fold in half (hamburger style) right side in.  Stitch along both sides of the bag, but leave the top side open.  Then, pin your seam open.
  6. Sew next to the seam two inches down, turn and sew across, sew next to the seam on the other side.  Repeat for other seam.
  7. Fold the top back 1 inch.  Pin all the way around.
  8. Sew 1/8 inch from the folded edge, all the way around the bag.  I used this really cute zig-zag stitch, but a straight stitch works just as well.
  9. Reinforce the two sides (see picture).  Once you have reinforced your sides, use a seam ripper to open the casing sides, so you can pull your rope through.
  10. Use a pin to pull the cord through one side, then back through the other.  Repeat for the other opening.  You must go all the way around with both lengths of cord, or the drawstring part won't work.
  11. Pull the cord flat through the casing, then straight down the side.  Place a piece of tape around the two cords where they meet at the bottom of the bag.  Then cut through right at the bottom.
  12. Flip the bag inside out.  Fold the corner out into a triangle.  Pin the cord into the corner, then sew 1 inch in from the corner.  Your sewing line will be 2 inches long.  Reinforce this seam with another line of stitches, then cut off the excess corner fabric.  Repeat for second side.
  13. Flip it back right side out and fill it with goodies.

Sunday, March 6, 2011

Anthropologie Inspired Tote

A couple weeks ago, I guest posted this tutorial on I Heart Naptime with Chocolate Sundaes.  Have you been to Jamielynn's blog?  You should definitely check it out if you haven't.  In case you missed the tutorial, here it is!
My Tote


Anthropologie's Tote
A few days ago I saw this picture on Anthropologie, and I couldn't wait to try making this bag.  I don't know about you, but I don't have $500 to spend on a tote.  Are you ready?  Here's what you'll need:
  • 1 yard lining/accent fabric - I used a plaid cotton with no right/wrong side
  • 2 yards 3/16 inch cording
  • 2/3 yard linen
  • Fusible batting (optional)
  • Stabilizer
  • Pins
  • Thread
The first thing you will want to do is iron and cut all your fabric.  From the lining/accent fabric cut:
  • one piece - 6" x 26" (bow)
  • two pieces - 6" x 2" (bow tie)
  • two pieces - 30" x 1.5" (cording wrap)
  • four pieces - 2" x 22" (straps)
  • four pieces - 13" x 5" (top edge inside and outside)
  • two pieces - 15" x 13" (inside front and back)
  • one piece - 15" x 7" (inside bottom)
  • two pieces 7" x 13" (inside sides)
From the linen cut:
  • two pieces - 15" x 13" (outside front and back)
  • one piece - 15" x 7" (outside bottom)
  • two pieces 7" x 13" (outside sides)
From the stabilizer cut:
  • two pieces 15" x 7" (bottom)
  • two pieces 13" x 5" (top)
From the batting cut (you can use stabilizer instead, or extra fabric):
  • two pieces 2" x 22" (straps)
Now you're ready to start sewing.  The first thing you will want to do is pleat your linen.  To make the front and back pleats, take the outside front and fold in half along the 15" side.  Set your stitch length to 4 or 5 and sew a line .5" from the fold.  You only need to sew it a few inches long.

Measure 2" from the first fold and make another fold.  Sew another line at that fold.  Repeat until you have five sewn folds.  All the folds should be on the same side of the fabric.  Repeat for the outside back piece.


For the sides, you will sew only one pleat.  Sew a line 1.5" from the fold.

Set your stitch length back to 2.5.  Sew the two pieces of stabilizer to the outside bottom (I found it easier to sew the two pieces of stabilizer together first, then sew them to the bottom).  Sew .25" from edge.

Using a .5" seam allowance, sew the front and back to the bottom.  You want the stabilizer on the outside while you sew as well as the loops you made for pleats (they are on the opposite edge from the seam).  Then sew the seam flat to the bottom, sewing .25" from original seam.

Before you sew in the sides, you need to cover your cording.  Fold the fabric in half around the cord.  Use a zipper foot, or a cord foot to sew the fabric around the cord.  You want your seam to be as close as possible to the cord itself.  I used a cord foot, which was super easy!

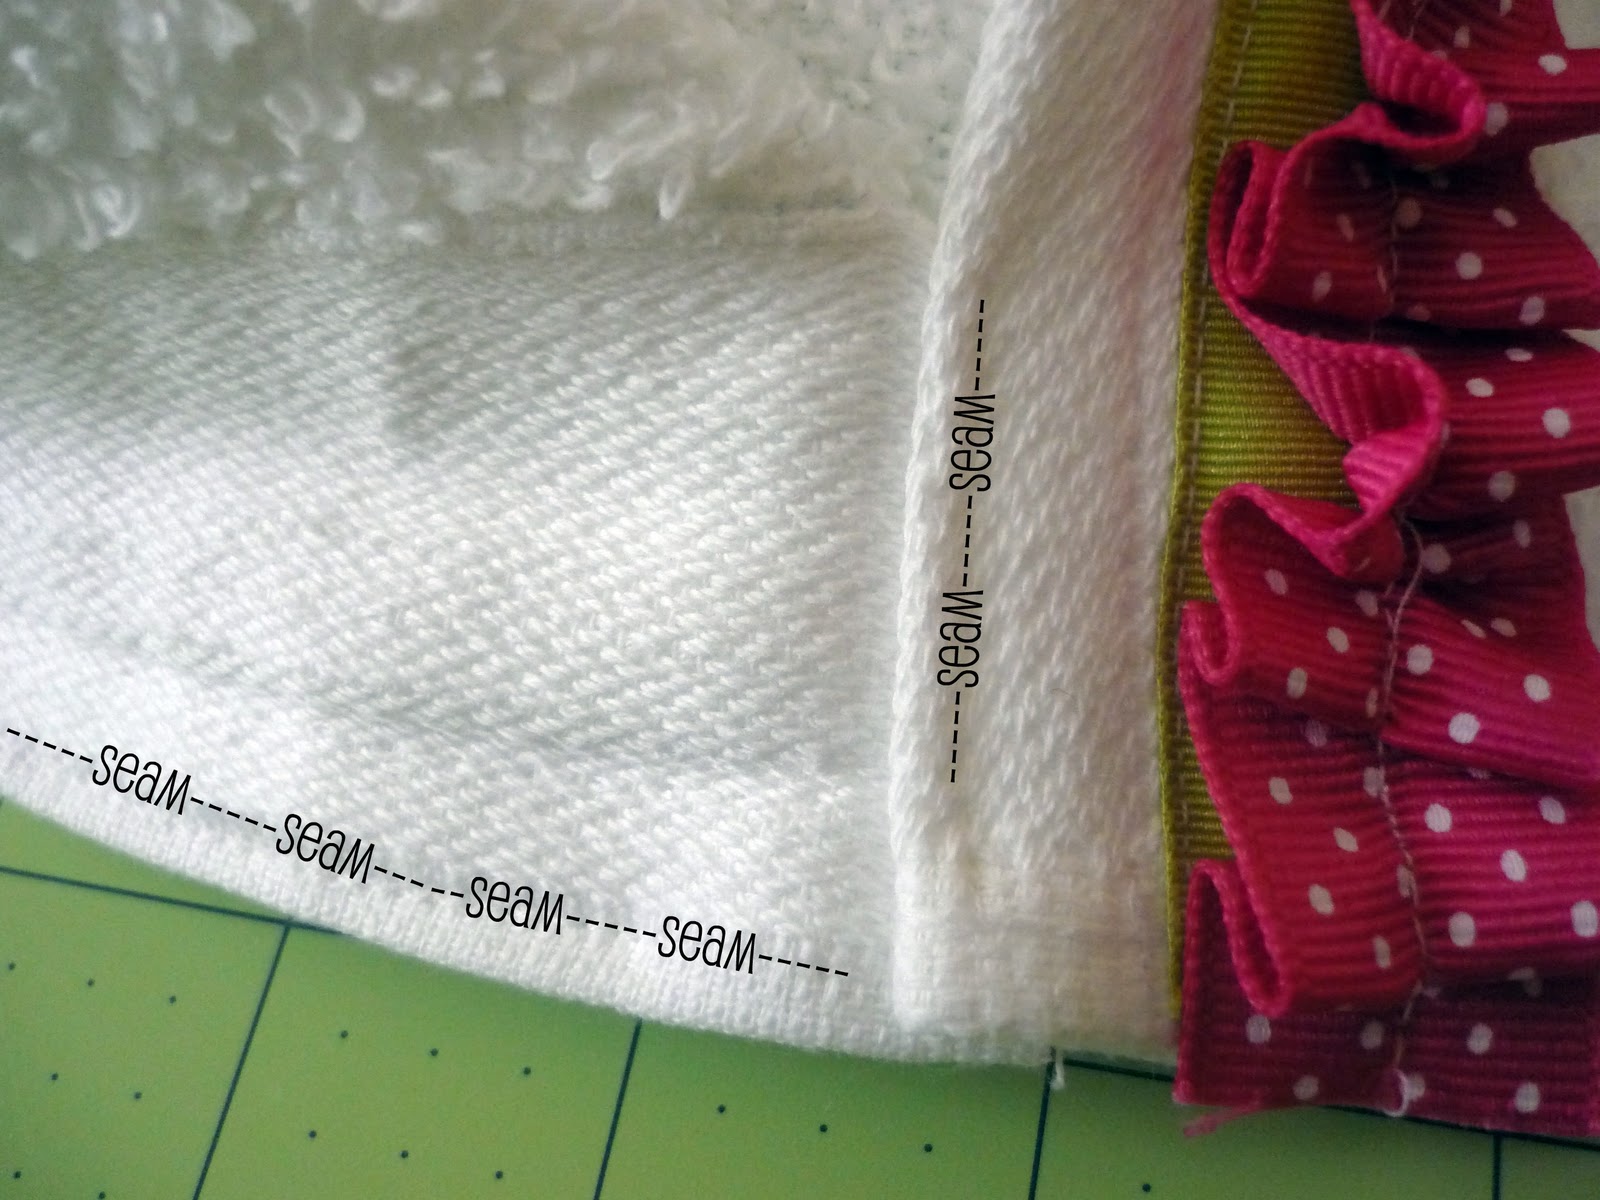
Now sew your sides to the back, front, and bottom of bag with the cording in the seam.  Sandwich the cording between the front of the bag and one of the sides.  The loops for your pleats should be facing down for the front, and up for the side.  Sew together using a .5" seam allowance.

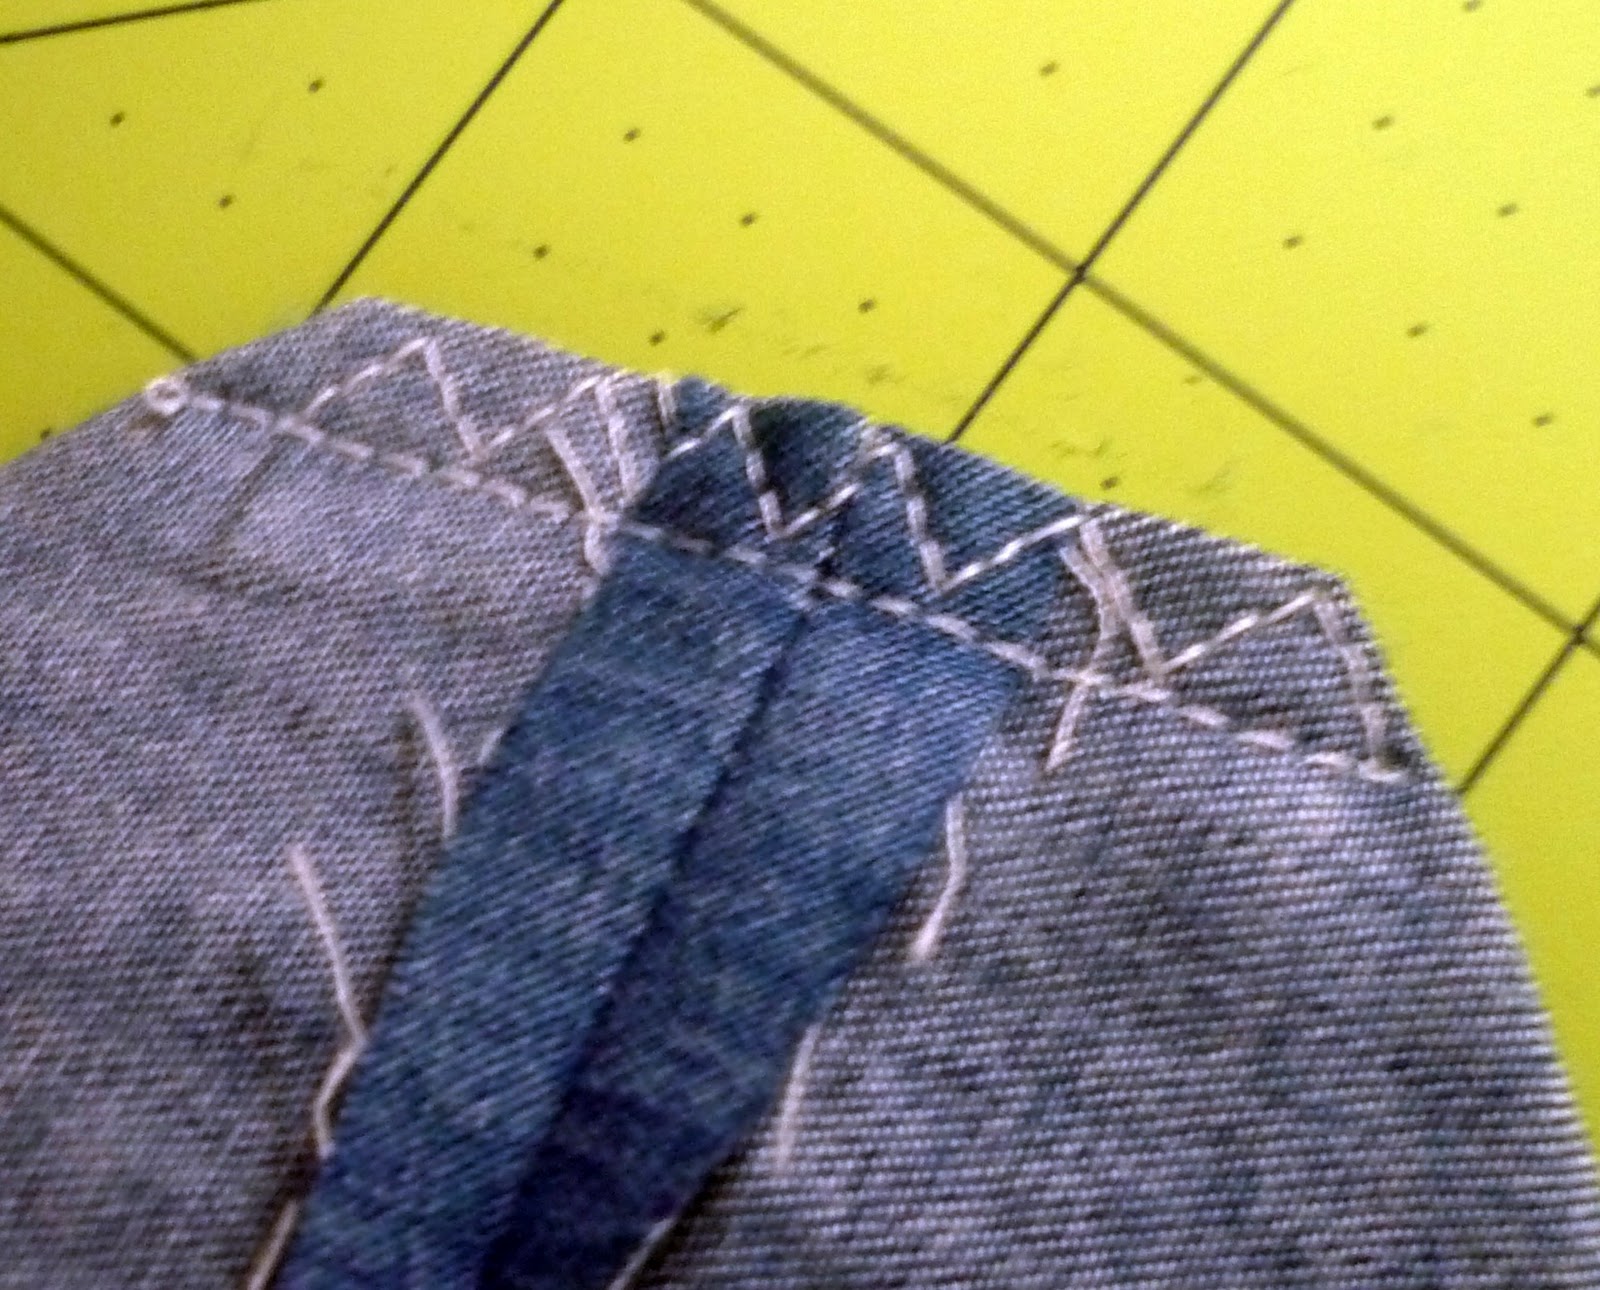
When you get to the seam for the bottom, lower your needle into the fabric, lift your presser foot, and pull the top fabric only to match the new edge.  Continue sewing bottom and repeat turn for last corner.

Your corner should look like this:

Repeat for the other side, and trim the tip off the corners, so they aren't as bulky.  Fold the seam flat to the bottom and stitch as you did the front and back seams.  Your bag should start to look like a bag.

Let's make those pleats look like actual pleats (not loops).  Use your fingers to press the loops flat as you sew a .25" seam around the top of the bag.  The center of each fold should match up to the seam of each pleat.  Then change your stitch length to 4 and repeat about 1" further in from original seam.

You are almost finished with the outside of the bag.  The final part for the outside is to add the top accent fabric.  Change your stitch length back to 2.5 and sew two of the top pieces together on both short sides with a .5" seam allowance.  You should now have a loop of fabric.  Repeat for the stabilizer.  I sewed the seam open and flat on the stabilizer to make it easier to work with in the bag.

Pin the stabilizer, accent loop, and outside bag together (all of your right sides should be facing in).  Line up the side seams with the center of your side pleat.  Then, use a .5" seam allowance to sew all layers together.


When you fold the flap up, it should look like this:

You will repeat these same steps for the lining of the bag.  The only differences are that the lining does not use any stabilizer or cording, and you will leave about a 5" gap in your seam on one side to pull the bag right-side-out.

Before sewing the lining to the bag, you need to make the straps.  Stack the batting (you could use stabilizer or extra fabric instead) on top of two layers of strap fabric (if you use fabric with right sides, put both right sides together).  Sew along the long edges .25" from edge.  Turn the straps right side out, and sew along the edge as close as possible.  Iron when you are done.


Turn the bag right side out, measure 3" from the side seam, and pin the straps to the bag.

Slide the lining over the outside bag with the lining facing right-side-in.  Pin the lining to the bag (make sure you get the straps pinned) matching the side seams.  Again, use a .5" seam allowance, sew the lining to the bag.

Turn the bag right-side-out by pulling it through the gap you left in the lining.  Sew the gap shut either by hand or machine.

To finish the bag, pick out the pleat seams, and the stabilizing seam.  Then, you will sew around the top .25" from the top edge, and again .25" from the pleated edge.

I adorned the top with a fabric bow, but you could use a flower or any other embellishment, or even leave it plain.

After all that work, I decided that the bag just didn't fit my needs.  I really need a new purse, but this is more of a tote.  I am a sucker for totes, but I already have about ten of them.  So I guess I will be selling this one on etsy.

I will be showing these off at these link parties.